Full CDC semantics land in the Iceberg output for Redpanda Connect
Your lakehouse mirrors the database, instantly.

Get insights from customer reviews using GenAI and streaming data technologies


Collecting, processing, and reacting to customer reviews in real time is crucial for brands. Firstly, it allows them to immediately identify and address issues for improved customer satisfaction. Secondly, it provides them with continuous feedback, which can be used to improve products or services. Lastly, it enables them to stay on top of changing customer preferences and market trends, giving them a competitive edge.
In this post, we’ll build a brand sentiment analysis solution by combining several streaming data and Generative AI technologies, including Redpanda, ClickHouse, and OpenAI.
Imagine a cat food brand creatively called “MeowMunch.” Customers engage with the brand across several touchpoints, including the website, mobile app, social media, and third party review platforms to publish product reviews.
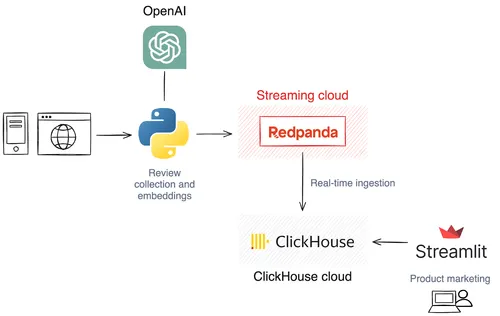
Ultimately, the solution will collect these reviews into Redpanda. For this tutorial we’ll use a Python script to simulate a review stream and publish it to a Redpanda topic. Before writing to Redpanda, this script will also use an OpenAI embedding model to generate vector embeddings for the review texts.
Next, we’ll configure the ClickHouse server to ingest reviews from Redpanda and make them ready for querying. Finally, the brand marketing team is presented with a web frontend — a Streamlit application that allows them to understand customer sentiment by asking questions like:
To give you a better idea, here’s a brief overview of the architecture.
Before we dive into the step-by-step process of building this solution, here’s what you’ll need to get started.
For this tutorial, you’ll need a few things installed on your local machine.
The completed source code for the tutorial is available at the following GitHub repository. Go ahead and clone it to your local workstation.
git clone https://github.com/dunithd/redpanda-clickhouse-vector-search.git
cd redpanda-clickhouse-vector-search/Before proceeding with the tutorial, ensure you have Python 3.x installed locally. You should also set up a Python virtual environment, like venv, to handle the dependencies.
Creating a virtual environment provides a sandbox for your project, preventing dependencies and versions from clashing with those of other projects. The command below creates and activates a new Python virtual environment named “vector-search”.
python3 -m venv vector-search
source vector-search/bin/activate
Now run the following command to install the Python dependencies for OpenAI, ClickHouse Connect, Kafka, and Streamlit.
pip install -r requirements.txt
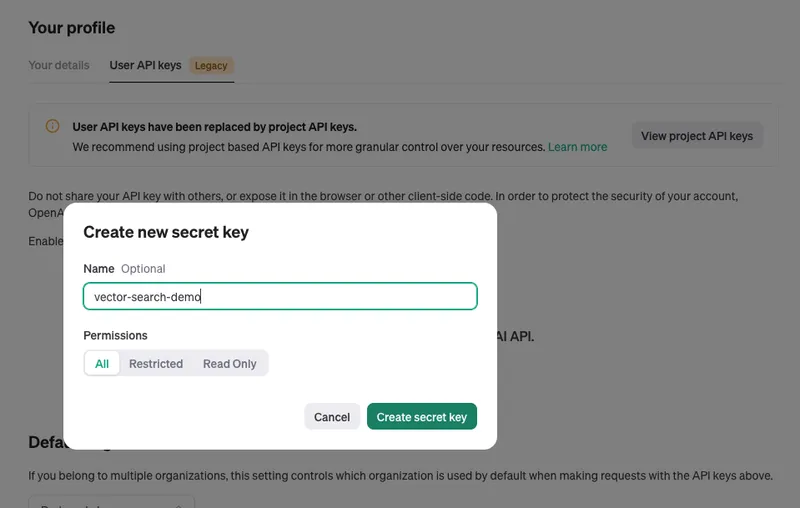
This tutorial will invoke several OpenAI APIs for creating vector embeddings. If you haven't already, create an account with the OpenAI Platform to obtain an API key. Keep the key safe for later.
Let’s get fancy with this tutorial and use a serverless Redpanda cluster. You can create up to five serverless Redpanda clusters with unlimited storage, so sign up for a free trial and follow the on-screen instructions to create a Redpanda cluster in your preferred cloud region.
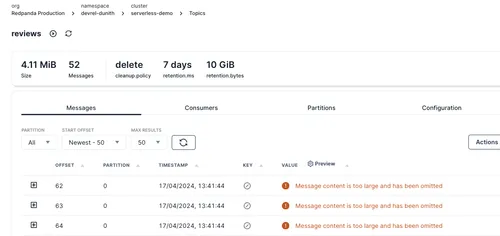
Once your cluster is ready, access the Topics menu in the left sidebar to create a topic called reviews. Leave the values on the UI as defaults. We’ll use this topic to ingest product reviews.
Next, you’ll need a user account to connect to this cluster. Click on the Security menu on the left sidebar to open the Kafka Access Control page. Then, create a new user account by clicking the Create user button.
Let’s call it demouser. Remember the generated password for the account.
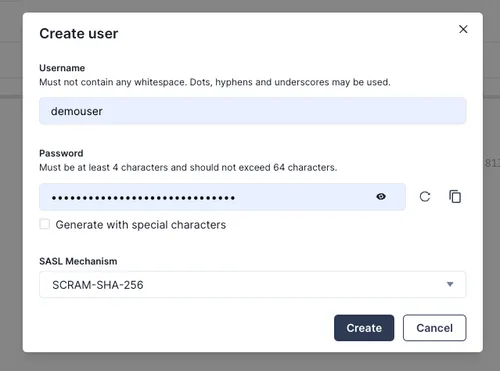
Finally, select the user account, and click on the Allow all operations to grant demouser account all read/write permissions. You can fine-tune the ACLs as needed.

Next, let’s hydrate the reviews topic with some product reviews. The ./data/reviews.json file contains 20 reviews about the MeowMunch product. A single review looks like this:
{
    "user": "Tracy",
    "review": "The Kitten Li'l Nibbles are great for my kitten, but they're a bit expensive for the quantity provided."
}
We'll publish these JSON objects into the reviews Redpanda topic by running the reviews_producer.py script. This Python script carries out several important tasks.
First, it reads and parses the ./data/reviews.json file into an array. This array is then processed to create vector embeddings for each review object using the OpenAI model text-embedding-3-small. At this point, you’ll need the OpenAI API key.
def get_embedding(text, model="text-embedding-3-small"):
   text = text.replace("\\n", " ")
   return client.embeddings.create(input = [text], model=model).data[0].embedding
Each review object is enriched with the generated vector embedding and finally published to the reviews Redpanda topic.
for review in reviews:
    review['embedding'] = get_embedding(review['review'])
    producer.send(topic, value=review)
Before running the script, set the environment variables required to connect the Redpanda cluster you created above. The variables are self-explanatory and you can find the relevant values in the Overview section of the cluster.
export RP_HOST="<redpanda_bootrap_server>:9092"
export RP_USER="demouser"
export RP_PASSWORD="<put_your_generated_password_here>"
export OPENAI_API_KEY="<put_your_api_key_here>"
Finally, run the script to hydrate the topic.
python3 ./reviews_producer.pyYou should see the reviews topic is now populated with reviews.
Great! We now have reviews in Redpanda. Next, we’ll configure ClickHouse to ingest them from Redpanda and prepare them for semantic search queries. We’ll use ClickHouse Cloud, which is the cloud-hosted and fully managed version of the ClickHouse database.
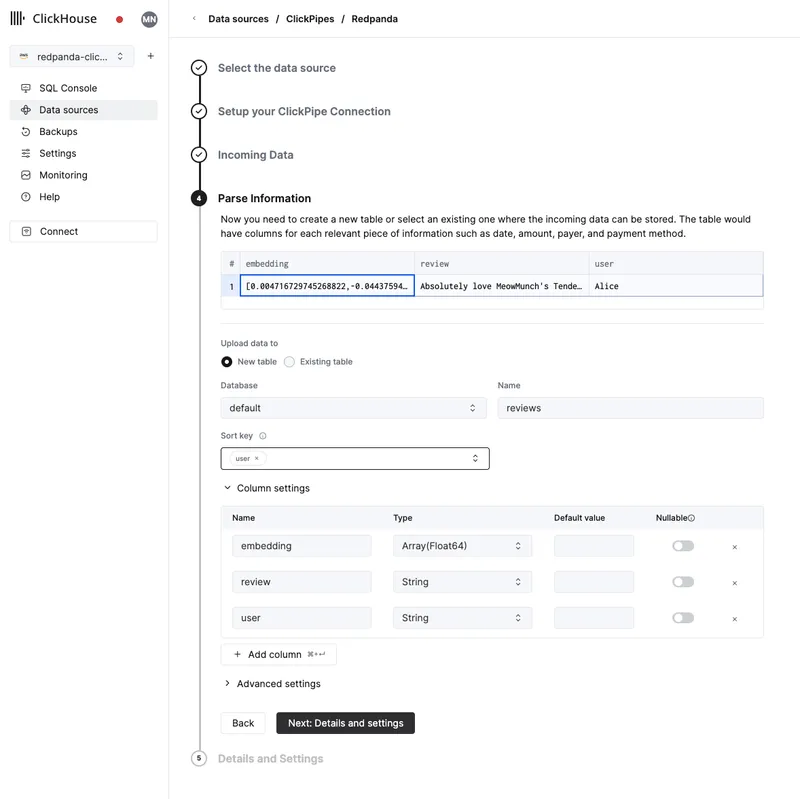
Create an account with ClickHouse Cloud and sign into the web console. Then, create a ClickPipe to ingest from the Redpanda cluster you just created.
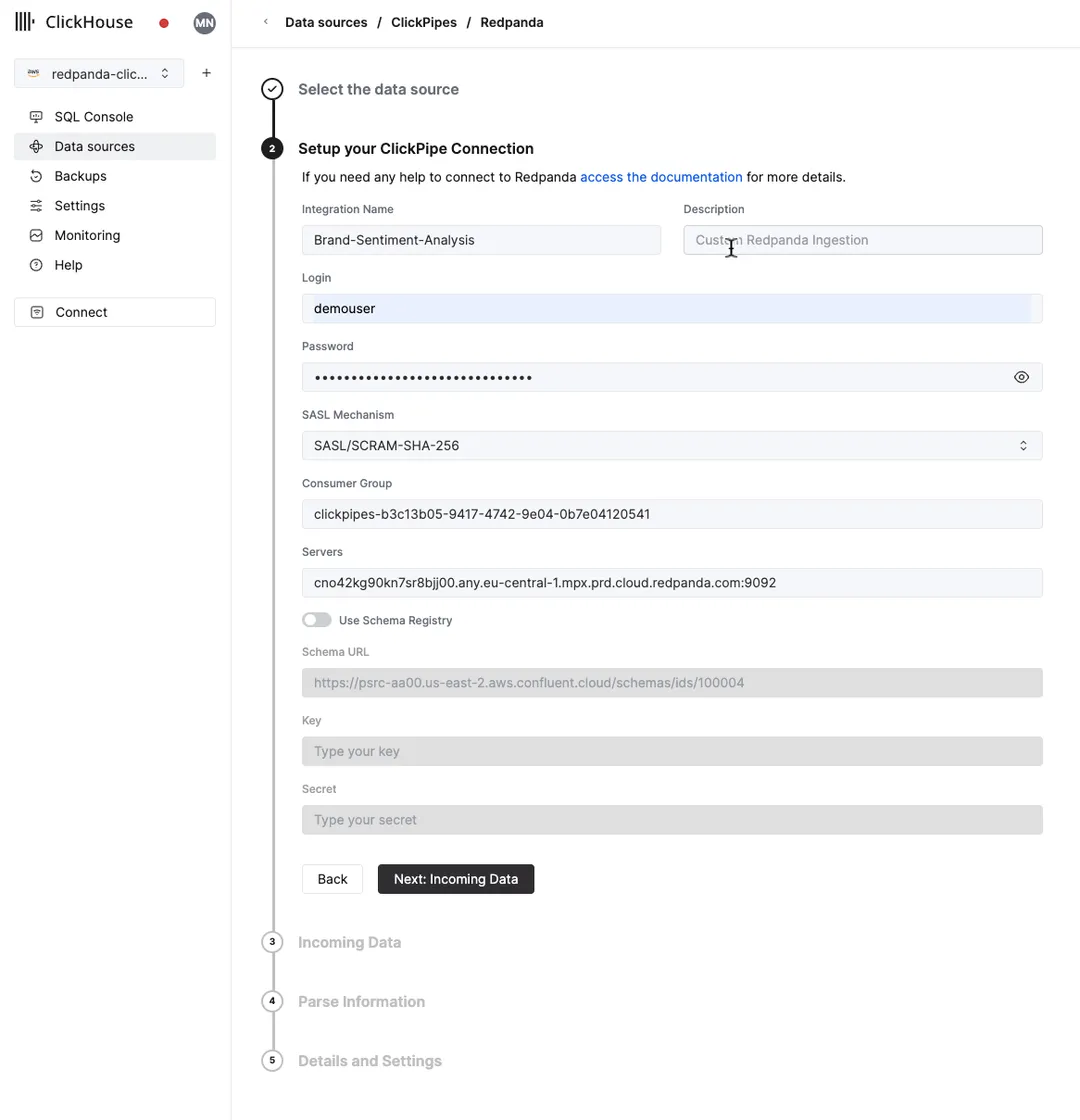
Provide the Redpanda cluster credentials when prompted, then select the reviews topic as the data source, and define the target table, reviews, as follows.
Once configured, this ClickPipe will commence the ingestion in seconds.
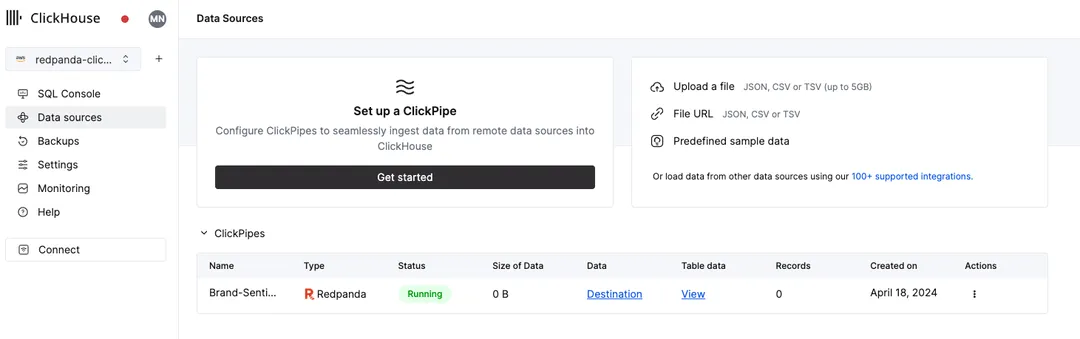
Click on the SQL Console menu on the left sidebar to check the reviews table is now populated with reviews.

For a more detailed walkthrough, watch this video on setting up a ClickPipe to Redpanda.
Now we have the necessary data infrastructure. But, not everyone in the company knows how to work with SQL. If we’re going to make this data accessible to other users, we need a more user-friendly way for them to access the data.
Streamlit is popular for quickly building prototypes of interactive frontends. So, we’re going to create an app that’ll let the user see common phrases used in reviews, find reviews similar to a provided search term, and see reviews similar to each other.
This dashboard would be mighty useful to MeowMunch's marketing team!
Start the Streamlit dashboard by running:
streamlit run app.pyThe dashboard will be available at http://localhost:8501. Next, let’s break down each widget displayed in the dashboard. The first widget aggregates the most popular phrases across all the reviews of MeowMunch. Here’s what it would look like:
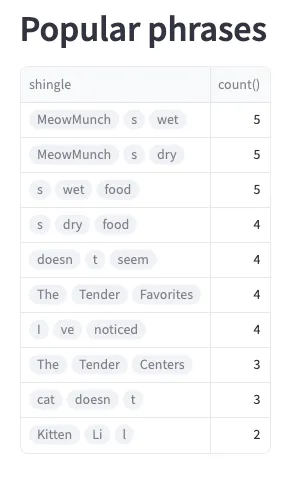
We did this using the following query, which computes n-grams of three tokens, excluding n-grams that start or end with common stop words.
WITH reviewTokens AS
    (
        SELECT tokens(review) AS textTokens
        FROM reviews
    )
SELECT
    arrayJoin(if(length(textTokens) < 3, [textTokens], arrayShingles(textTokens, 3))) AS shingle,
    count()
FROM reviewTokens
WHERE numberOfStopWords(shingle) <= 1 AND not startsOrEndsWithStopWord(shingle)
GROUP BY ALL
ORDER BY count() DESC
LIMIT 10Next we have the “similar reviews” widget. This widget allows you to search for similar reviews for a selected view.
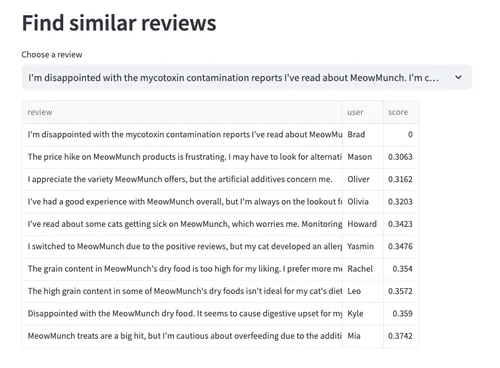
This one uses vector search in ClickHouse. We take the embedding vector for the selected review, compute the cosineDistance from that review to all the other ones, and then show the ones with the smallest score. The first result is always ourselves and then the others have semantically similar text. The query to do that is shown below.
-- A function that gets the embedding vector for the selected review
CREATE OR REPLACE FUNCTION getEmbedding AS (selectedReview) -> (
    select embedding
    from reviews
    WHERE review = selectedReview
    LIMIT 1
);

SELECT
        review,
        user,
        cosineDistance(embedding, getEmbedding({selectedReview:String})) AS score
    FROM reviews
    ORDER BY score ASC
LIMIT 10This is the most interesting widget. It returns semantically similar reviews for a given search term. For instance, you can search for all the reviews that mention the product being expensive.
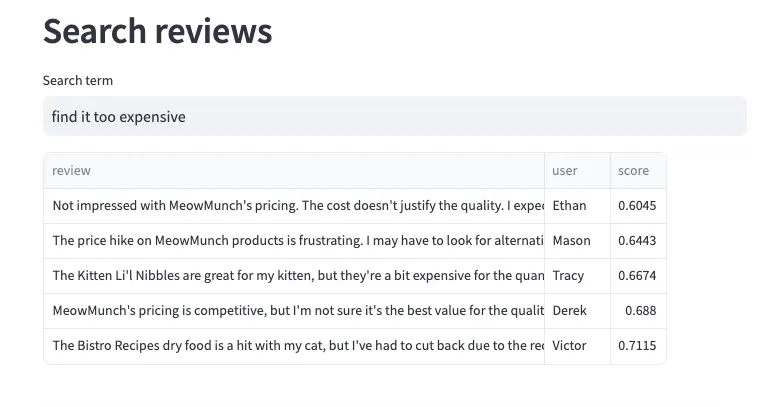
If you publish more reviews into Redpanda, this dashboard will be updated in real time to reflect the latest customer sentiment about the product. It also uses vector search, but this time we create an embedding of the search term and compare that against the embedding of all the reviews, before returning the ones with the smallest score.
You can find the source code of the dashboard in the app.py file.
In this tutorial, we walked you through building a real-time brand sentiment analysis solution using Redpanda, ClickHouse, and OpenAI. This solution collects and processes customer reviews in real-time, offering brands the ability to immediately identify and address issues, gather continuous feedback, and stay on top of market trends.
It's worth noting that while this tutorial focused on a specific use case, the principles and technologies used here can be applied to a wide range of real-time data processing tasks.
If you have questions about this tutorial or the technologies we used here, just ask in the Redpanda Community on Slack!
Subscribe to our VIP (very important panda) mailing list to pounce on the latest blogs, surprise announcements, and community events!
Opt out anytime.