
Bridge Queries in Redpanda SQL
Have your real-time cake and eat your analytics too
Learn how to simplify real-time CDC with Redpanda Connect


Change data capture (CDC) has become a cornerstone of modern data architectures, allowing organizations to track and instantly respond to data changes as they happen. By capturing changed data on a database and streaming it, CDC enables businesses to build scalable systems for analytics, event-driven applications, and seamless data replication.
Here are a few common use cases of CDC:
In this tutorial, you’ll learn how to implement real-time CDC using PostgreSQL and Redpanda Connect. You’ll be walked through the architecture, setup, and step-by-step process to capture changes from PostgreSQL and stream them to Redpanda topics, showcasing how Redpanda Connect simplifies this process.
Suppose you work for a retail company that wants to build a real-time inventory tracking system. The technical management wants you to implement a system that does the following:
This solution ensures that inventory data remains up-to-date across all systems. Here’s a rough architecture diagram:
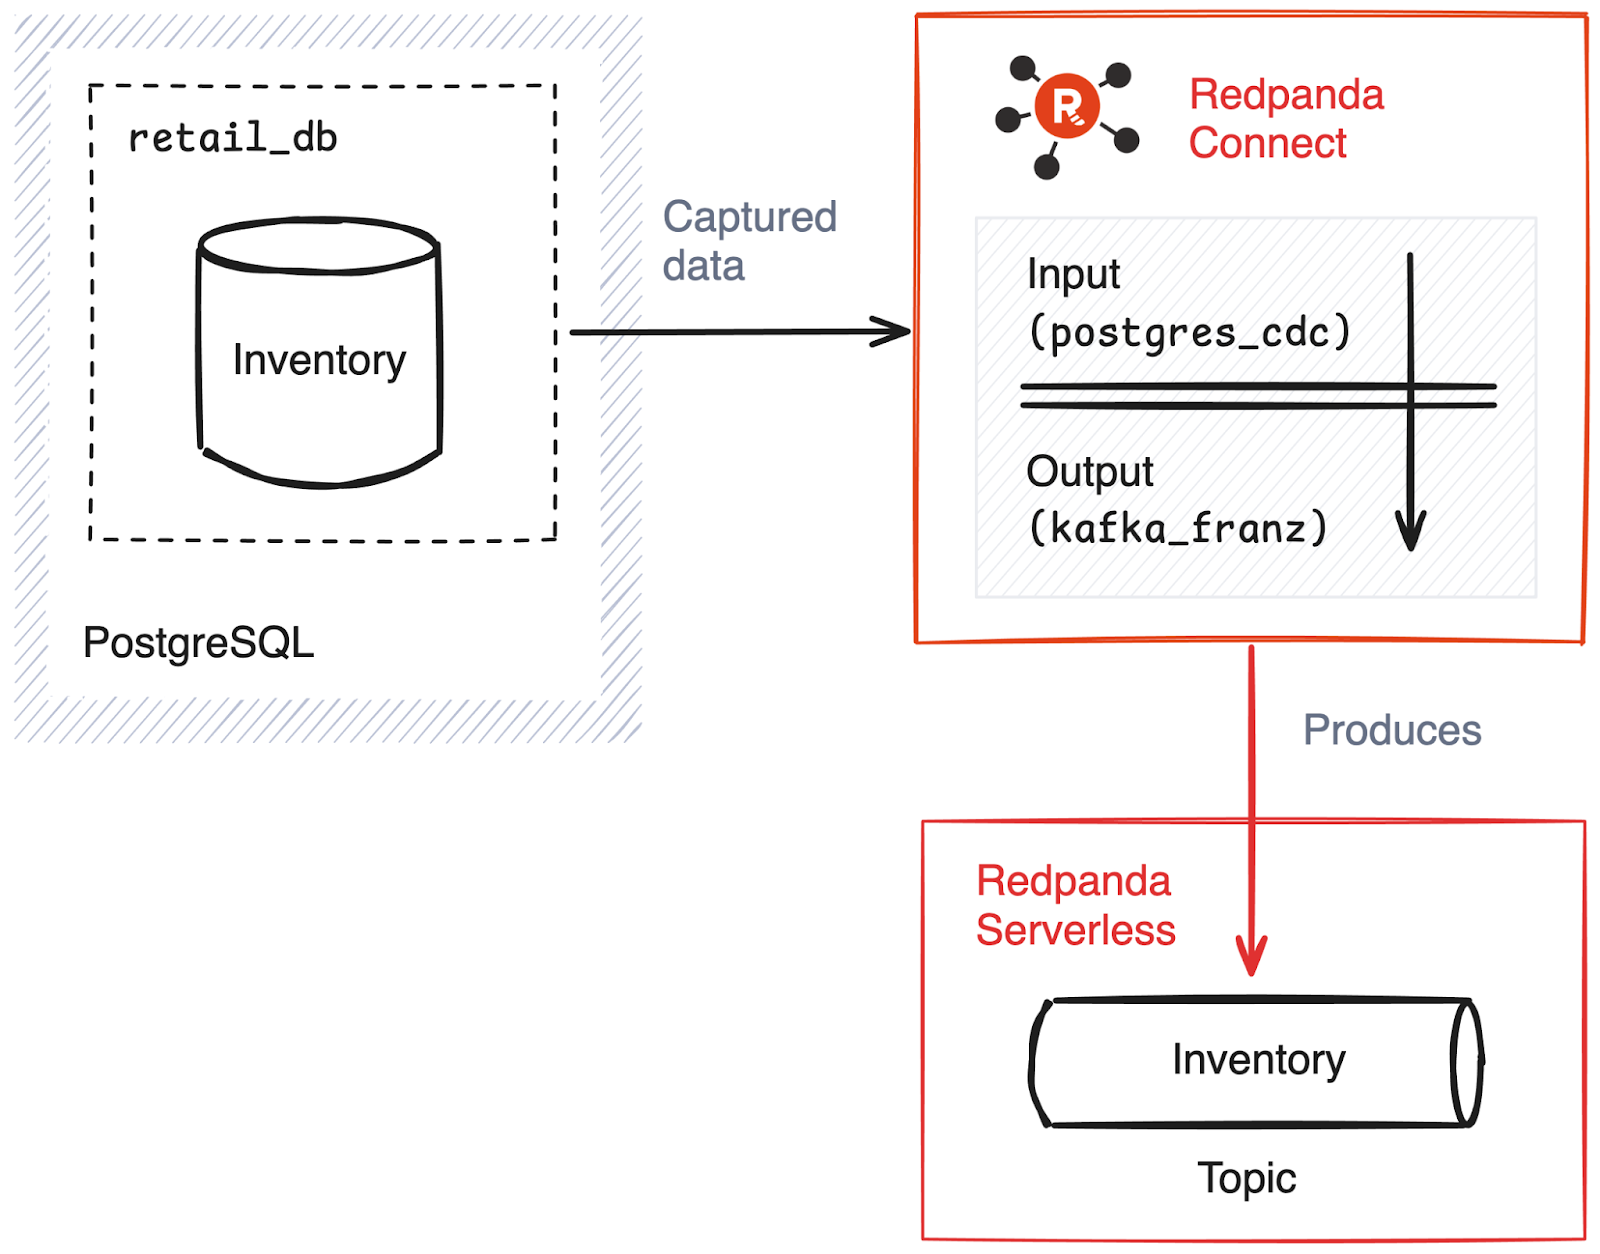
Here, PostgreSQL is the source of truth for inventory data, and Redpanda Connect facilitates CDC and streams changes to Redpanda topics. Once the data is sent to topics, it can be consumed via any consumer, such as other applications or dashboard and alerting systems.
You’ll need the following to complete the tutorial:
rpk CLITo access Redpanda for your application, you need a topic for the data and access to the Redpanda Cloud secure cluster. You can manage your Redpanda Serverless cluster and create topics using rpk with the cloud option.
Start by logging in to your Redpanda Serverless account with the following command:
rpk cloud loginThis should redirect you to your browser, where you’ll need to log in. After you do so, you should see a message confirming your login was successful, and you’ll be prompted to select your cluster:
...output omitted...
Successfully logged into cloud organization "YOUR_ORGANIZATION" (********) via sso.
...output omitted...
? Which cloud resource-group/cluster would you like to talk to?  [Use arrows to move, type to filter]
> YOUR_CLUSTER_NAME_HERE
Press the Enter key to select your pre-created cluster. You’ll then be ready to access your Redpanda Serverless cluster via the command line.
To create the required topic for the application, first run the following command to create a topic called inventory on your cluster:
rpk topic create inventoryYou should get the following output, confirming that it was created:
TOPIC      STATUS
inventory  OK
You’ll need to allow external access to your topic. In your browser, navigate to the main page of your cluster, where you should see information about your cluster and how to connect to it:

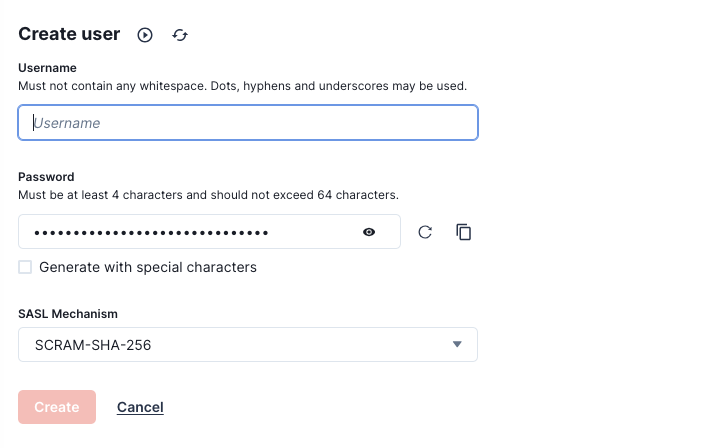
On the left menu, click Security, which should open the “Access control” page of the cluster. Then, on the Users tab, click Create user.
Enter a username of your choice and set a password, then select SCRAM-SHA-512 as the SASL mechanism. For more information on Kafka security and SCRAM-SHA-512, see the documentation.
After creating the user, click the Create ACLs link on the success page. On the opened page, click the username to edit the user’s access control list (ACL).
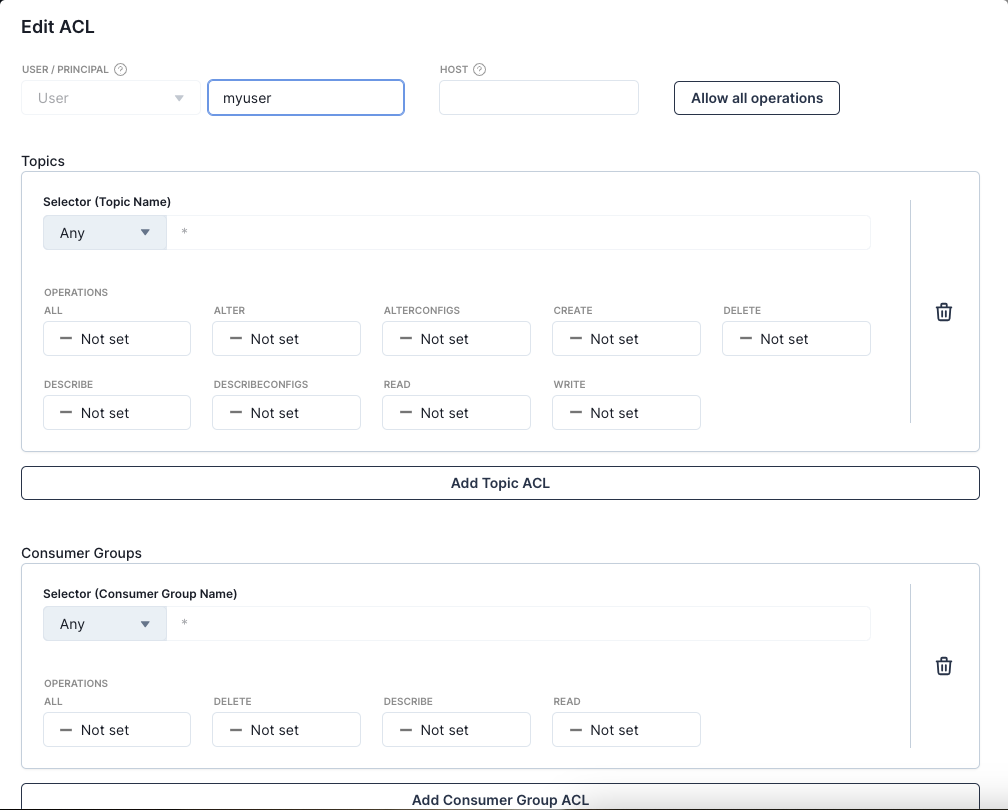
Click the Allow all operations button, which is at the top right of the pop-up window. Scroll down and click OK to save your user’s ACL configuration.
For real-world deployments, you should create separate users with different credentials for each topic to enhance security. However, for this demo, the user is granted full access to all topics and operations.
Before running a PostgreSQL instance on Docker, you need to create a directory to store the configuration file. This ensures that your configurations are non-ephemeral, meaning that restarting your PostgreSQL container won’t cause you to lose them.
Run the following command to create a postgresql_data folder in your home directory and set its permissions to chmod 700:
mkdir -p ~/postgresql_data; chmod 700 ~/postgresql_dataTo create and start a PostgreSQL instance in a Docker container, use the following command:
docker run --name postgres_cdc \
  -e POSTGRES_USER=cdc_user \
  -e POSTGRES_PASSWORD=password \
  -e POSTGRES_DB=retail_db \
  -p 5432:5432 \
  -v ~/postgresql_data:/var/lib/postgresql/data \
  -d postgres:latest \
  -c config_file=/var/lib/postgresql/data/postgresql.conf
The -v flag mounts the postgresql_data folder you created to persist database data. This command also defines a user named cdc_user with the password password for the database retail_db. Note that the password is intentionally simple for demo purposes. In production environments, you should always use a secure password.
The postgres_cdc Docker instance also creates a postgresql.conf file in the postgresql_data folder; open this file with your preferred editor and add the following configuration at the end:
wal_level = logical
max_replication_slots = 4
max_wal_senders = 4
This configuration enables the logical replication in your PostgreSQL instance, which is leveraged by CDC. For more information, you can view the PostgreSQL Write Ahead Log (WAL) documentation.
For configuration changes to take effect, restart your PostgreSQL instance by executing the following command:
docker restart postgres_cdcOnce your postgres_cdc container is running without any issues, you’ll need to grant the REPLICATION role to cdc_user for all tables. To do this, you’ll first need to access the container’s bash interface by running the following command:
docker exec -it postgres_cdc bashIf you see something like root@a96dfcce75b9:/# in your terminal, you are in the bash shell of your PostgreSQL container.
Run the following command to enter retail_db with your user cdc_user:
psql -U cdc_user -d retail_dbYou should see the following output:
psql (17.2 (Debian 17.2-1.pgdg120+1))
Type "help" for help.

retail_db=#
Once you see the psql prompt for retail_db, run the following SQL command to grant the REPLICATION role to cdc_user:
ALTER ROLE cdc_user WITH REPLICATION LOGIN PASSWORD 'password';Your CDC connector will use this role to access your database with the same user.
Provide full access to any table created on your database for cdc_user:
GRANT SELECT ON ALL TABLES IN SCHEMA public TO cdc_user;Run the following command to create a table called inventory in your retail_db database, which you’ll use to store the inventory records:
CREATE TABLE IF NOT EXISTS inventory (
    id SERIAL PRIMARY KEY,
    product_id INT NOT NULL,
    quantity INT NOT NULL,
    timestamp TIMESTAMP DEFAULT CURRENT_TIMESTAMP
);
You’ve now created your PostgreSQL instance, configured it for CDC, enabled your database user with replication and access rights, and created the inventory table. In the next section, you’ll learn how to use this setup to consume data through a CDC integration.
To configure your PostgreSQL CDC connector, create a YAML file called connect.yaml in your home directory and insert the following content:
input:
  label: "cdc"
  postgres_cdc:
    dsn: postgres://cdc_user:password@localhost:5432/retail_db?sslmode=disable
    stream_snapshot: true
    schema: public
    tables:
      - inventory
    temporary_slot: true

output:
  kafka_franz:
    seed_brokers:
      - YOUR_REDPANDA_SERVERLESS_BROKER_ADDRESS
    topic: inventory
    tls:
      enabled: true
      skip_cert_verify: true
    sasl:
      - mechanism: SCRAM-SHA-512
        password: YOUR_REDPANDA_SERVERLESS_PASSWORD
        username: YOUR_REDPANDA_SERVERLESS_USERNAME
Remember to replaceYOUR_REDPANDA_SERVERLESS_BROKER_ADDRESS,YOUR_REDPANDA_SERVERLESS_USERNAME, andYOUR_REDPANDA_SERVERLESS_PASSWORDwith your actual Redpanda Serverless details.
This configuration file sets up Redpanda Connect to capture data changes in the inventory table from the retail_db database in PostgreSQL and stream that data to the inventory topic in your Redpanda Serverless cluster.
postgres_cdc input and a kafka_franz output.input area, the configuration for dsn and tables tells the connector where to get the data from. The temporary_slot: true is useful for demo purposes but should not be used in production.output area, the seed_brokers and topic configurations specify the Redpanda Serverless broker address and the topic to write the data to.sasl section specifies the credentials and the SASL mechanism required to authenticate with Redpanda Serverless.This configuration sets skip_cert_verify: true to disable SSL certificate verification for this demo, but it’s recommended to enable it in production for security. For more configuration option details, check the Redpanda Connect documentation.
Save the file after you update it with your own information, and execute the following command in your home directory to run your Redpanda Connect instance:
rpk connect run ./resources/connect.yamlMake sure your Redpanda license file (redpanda.license) is placed in the/etc/redpanda/directory before running Redpanda Connect. Otherwise, the instance will fail to start.
You should get an output similar to the following:
INFO Running main config from specified file       @service=redpanda-connect benthos_version=4.46.0 path=./resources/connect.yaml
INFO Listening for HTTP requests at: http://0.0.0.0:4195  @service=redpanda-connect
INFO Launching a Redpanda Connect instance, use CTRL+C to close  @service=redpanda-connect
INFO Creating publication pglog_stream_rs_CYMGP1HQPE1E9Q0VCR3P87GT1SK4YJQR for tables: ["public"."inventory"]  @service=redpanda-connect label=cdc path=root.input
INFO Input type postgres_cdc is now active         @service=redpanda-connect label=cdc path=root.input
INFO Output type kafka_franz is now active         @service=redpanda-connect label="" path=root.output
Keep this terminal window open and start a new terminal window for the remainder of the steps in this tutorial.
To mimic a retailer system, you should create and run a Python-based application that generates random inventory data, which is then saved in the inventory table.
Create a Python application file called retailer.py in your home directory with the following content:
import psycopg2
import time
import random

# Database connection parameters
DB_CONFIG = {
    "host": "localhost",
    "database": "retail_db",
    "user": "cdc_user",
    "password": "password"
}

# Product list for random selection
PRODUCTS = [
    (101, "Laptop"), (102, "Smartphone"), (103, "Tablet"),
    (104, "Headphones"), (105, "Monitor"), (106, "Keyboard"),
    (107, "Mouse"), (108, "Smartwatch"), (109, "Speaker"),
    (110, "External HDD")
]

def insert_random_inventory():
    """Inserts random inventory data every 5 seconds."""
    try:
        connection = psycopg2.connect(**DB_CONFIG)
        cursor = connection.cursor()

        while True:
            product = random.choice(PRODUCTS)  # Select a random product
            product_id = product[0]
            quantity = random.randint(1, 50)  # Random stock quantity

            cursor.execute(
                "INSERT INTO inventory (product_id, quantity) VALUES (%s, %s);",
                (product_id, quantity)
            )
            connection.commit()

            print(f"Inserted: Product ID {product_id} - Quantity {quantity}")

            time.sleep(5)  # Wait for 5 seconds before the next insert

    except Exception as e:
        print(f"Error: {e}")
    finally:
        cursor.close()
        connection.close()

if __name__ == "__main__":
    insert_random_inventory()
The application defines the database configuration with DB_CONFIG as well as a list of products under PRODUCTS for random selection. In the insert_random_inventory function, which is called from the script’s main function, you can see that psycopg2 connects to the PostgreSQL database using the DB_CONFIG configuration.
The while loop runs every 5 seconds, selecting a random product from the list and inserting a random quantity between 1 and 50 into the inventory table. The cursor.execute() method is used to insert the data, and connection.commit() saves the changes to the database.
Before running the Python script, you should create a Python virtual environment. This way, you can install the psycopg2 dependency into your virtual environment instead of your main environment.
Run the following command to create and activate your virtual environment:
python3 -m venv .venv ; \
source .venv/bin/activate
Once you are in your activated virtual environment, run the following command in your home directory where your retailer.py file resides:
pip install psycopg2-binary ; \
python retailer.py
The outputs of the application should start appearing in your terminal, similar to the following:
...output omitted...
Inserted: Product ID 106 - Quantity 42
Inserted: Product ID 102 - Quantity 35
Inserted: Product ID 102 - Quantity 18
Inserted: Product ID 104 - Quantity 10
...output omitted...To verify your Redpanda Connect CDC configuration is running without a problem, you can review the inventory topic data. The best way to do this is to consume data from the topic, and the simplest way is to use the rpk CLI.
Open a new terminal window and run the following command to start consuming data from your inventory topic:
rpk topic consume inventoryIf you followed every step carefully and applied every configuration correctly, you should see an output stream as follows:
...output omitted...
{
  "topic": "inventory",
  "value": "{\"id\":671,\"product_id\":105,\"quantity\":17,\"timestamp\":\"2025-02-09T20:11:11.199865Z\"}",
  "timestamp": 1739131958134,
  "partition": 0,
  "offset": 670
}
{
  "topic": "inventory",
  "value": "{\"id\":672,\"product_id\":104,\"quantity\":27,\"timestamp\":\"2025-02-09T20:11:16.209913Z\"}",
  "timestamp": 1739131958142,
  "partition": 0,
  "offset": 671
}
{
  "topic": "inventory",
  "value": "{\"id\":673,\"product_id\":101,\"quantity\":50,\"timestamp\":\"2025-02-09T20:11:21.217885Z\"}",
  "timestamp": 1739131958143,
  "partition": 0,
  "offset": 672
}
{
  "topic": "inventory",
  "value": "{\"id\":674,\"product_id\":110,\"quantity\":9,\"timestamp\":\"2025-02-09T20:11:26.225539Z\"}",
  "timestamp": 1739131958144,
  "partition": 0,
  "offset": 673
}
{
  "topic": "inventory",
  "value": "{\"id\":675,\"product_id\":108,\"quantity\":14,\"timestamp\":\"2025-02-09T20:11:31.233278Z\"}",
  "timestamp": 1739131958147,
  "partition": 0,
  "offset": 674
}
...output omitted...
Congratulations! You’ve quickly created a CDC system to present to your retail company’s technical management.
By enabling logical replication in PostgreSQL, configuring the Redpanda PostgreSQL connector, and streaming data to a Redpanda topic, you’ve seen how simple it is to implement a powerful use case for real-time data processing. CDC bridges the gap between relational databases and streaming platforms, and Redpanda Connect simplifies CDC by providing an intuitive and efficient integration.
For the demo application code, visit this GitHub repository. If you’re interested in additional CDC demos, check out this example using Iceberg as a data target and its corresponding GitHub repository.
Ready to explore more? To get started with Redpanda, go ahead and browse the documentation. To take it for a spin, sign up for a free trial.
Subscribe to our VIP (very important panda) mailing list to pounce on the latest blogs, surprise announcements, and community events!
Opt out anytime.