


Governing AI agents in production: what's new in the Redpanda Agentic Data Plane
Now deployable on Amazon Web Services (AWS)
Protect your data from unauthorized access in just six steps


A data streaming platform should be fast and reliable — but it should also be smart about who gets access to the data and how. That’s where OpenID Connect (OIDC) comes in. Built upon OAuth 2.0, OIDC is the identity layer that lets modern systems speak the same language about users and access. It allows you to centralize, govern, and audit identity and access management (IAM) across a wide range of services, applications, and platforms.
Redpanda’s OIDC single sign-on (SSO) works with providers like Okta, Keycloak, GitHub, and Microsoft Entra ID. So whether you're a platform engineer securing internal developer tools or an enterprise architect standardizing identity protocols across your stack, configuring OIDC with Redpanda keeps you in line with modern security best practices without sacrificing performance or ease of use.
OIDC authentication is available in Redpanda Enterprise Self-Managed, Redpanda Cloud’s Bring-your-own-cluster (BYOC), and Redpanda Cloud Dedicated. It’s important to note that while OIDC authentication can be enabled for SSO login to Redpanda Console on all of these deployment methods, as of the time of this writing, OIDC authentication to the Kafka API, HTTP Proxy API, Admin API, and Schema Registry API is only available in Redpanda Enterprise Self-Managed.
This blog post demonstrates how to set up Redpanda OIDC authentication in a local development environment with Docker Compose.
There are two distinct parts to the configuration:
Here’s a high-level overview of the authentication and authorization flow:
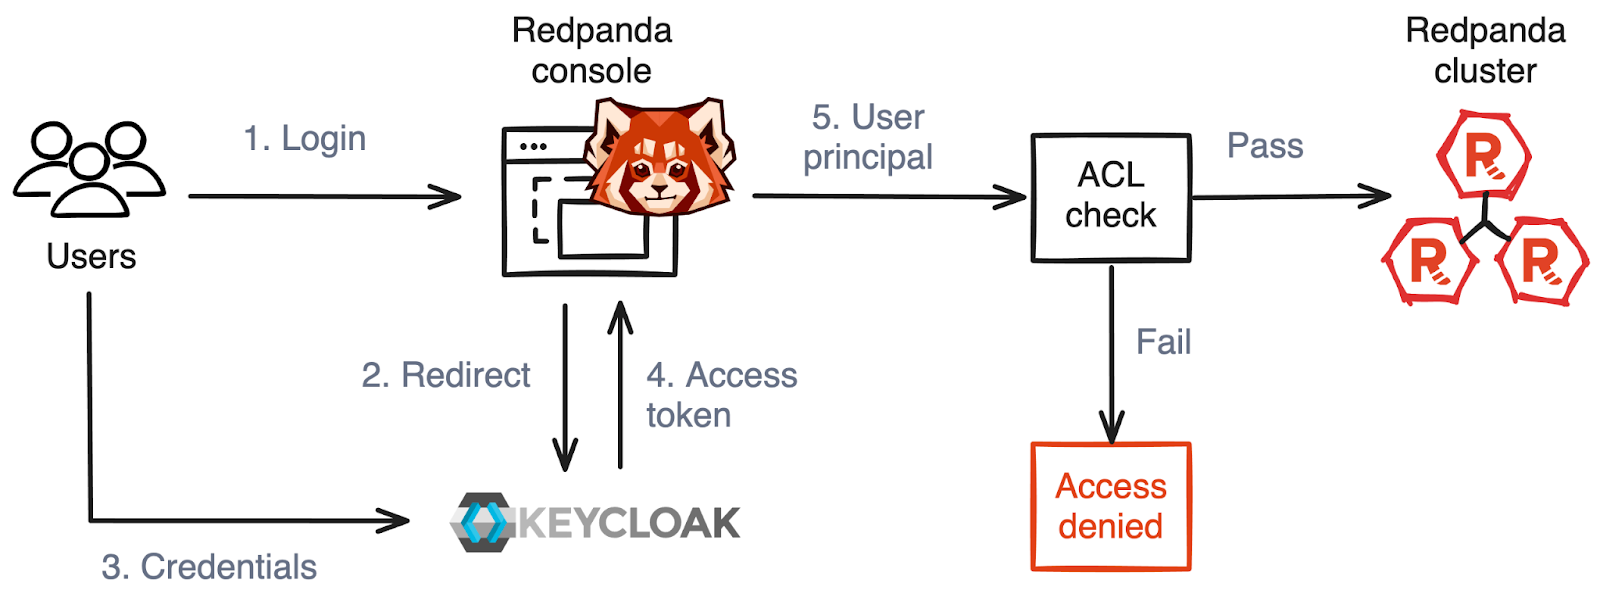
When you spin up a new Redpanda Self-Managed cluster, you get a 30-day trial license. This license allows unrestricted use of enterprise features like OIDC authentication. After 30 days, inactive enterprise features are disabled, and active features enter a restricted state.
To follow along, make sure you have Docker and Docker Compose installed, along with our rpk CLI. All the files you need for this tutorial are available in this GitHub repository, including a preconfigured Docker Compose environment that spins up Keycloak, Redpanda Console, and a Redpanda Cluster with OIDC authentication.
We’ll use Keycloak, a popular open-source identity and access management (IAM) solution that functions as an IdP. Implementing TLS is strongly recommended for secure communication.
To keep things simple, we’ll use HTTP with no TLS. Of course, if you can generate certificates issued by trusted Certificate Authorities (CAs), these examples can be adapted to test out the behavior with TLS enabled.
The Docker Compose file contains the configuration for a local instance of Keycloak and a Postgres database to persist the data between restarts.
Run the Docker Compose file and exec into the Keycloak container to disable TLS on the master realm. Enter the password admin when prompted. (Note the Redpanda Console container will fail, this is expected until we configure OIDC later on).
docker-compose up -d
docker exec -it keycloak sh
cd /opt/keycloak/bin
./kcadm.sh config credentials --server http://keycloak:8088 --realm master --user admin
./kcadm.sh update realms/master -s sslRequired=NONE
Modify your local hosts file to allow name resolution for Keycloak and Redpanda Console. If you don’t set this, Keycloak admin UI and redirects won’t work in your local browser. Here’s an example using nano on Mac OS.
sudo nano /etc/hosts
127.0.0.1 keycloak
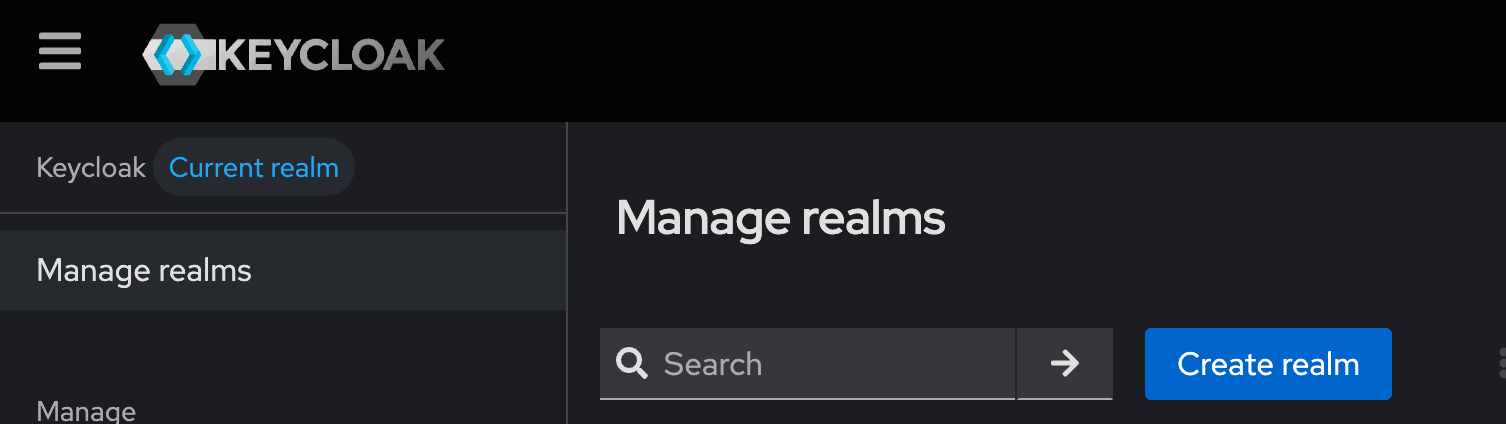
127.0.0.1 redpanda-consoleNavigate your browser to http://keycloak:8088/admin and click Manage Realms -> Create realm. Name it redpanda and click Create.
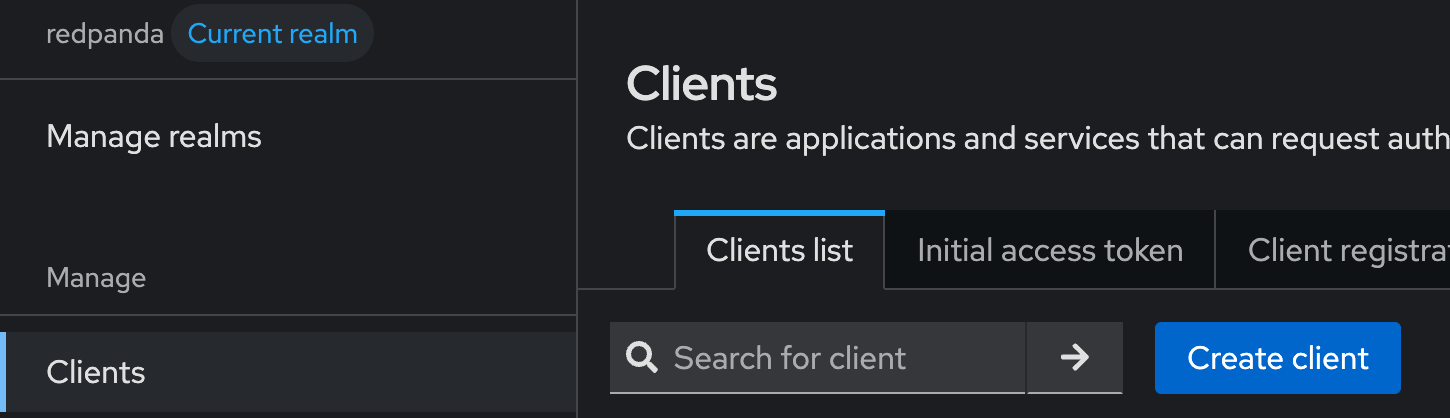
With the redpanda realm selected, click Clients -> Create client.
Ensure the client type is OpenID Connect and set Client ID to redpanda. Click Next.
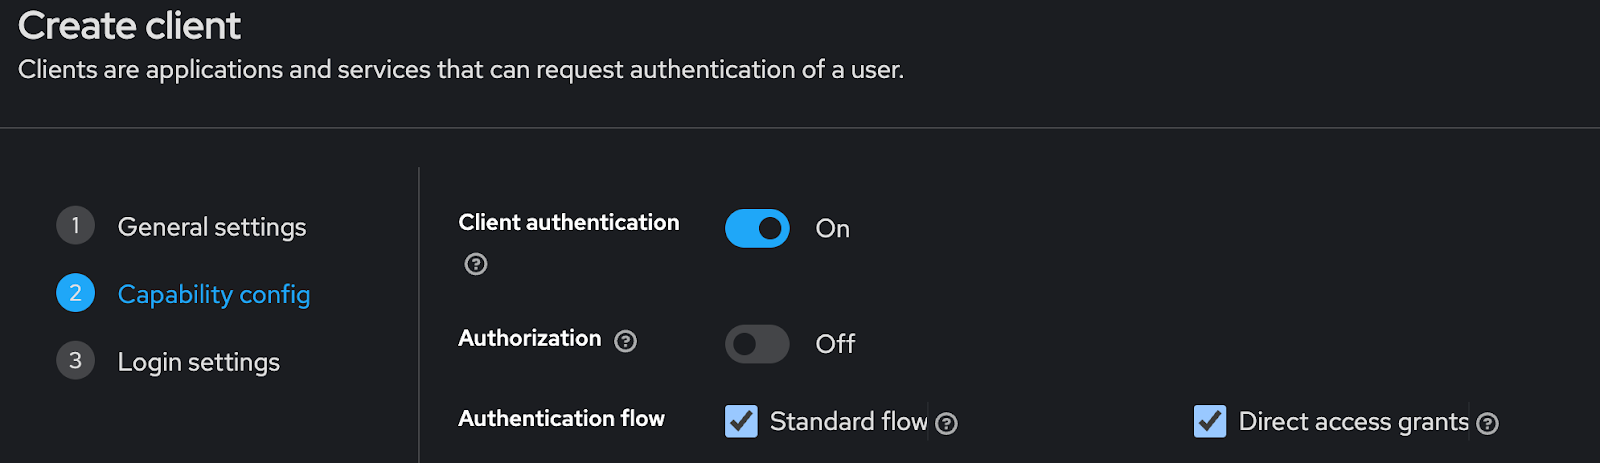
On the Capability config page, enable Client Authentication, Standard Flow, and Direct access grants (this will allow us to get tokens directly to test the HTTP APIs). Click Next.
On the Login settings page, you will enter your Redpanda Console details as follows:
http://redpanda-console:8080http://redpanda-console:8080http://redpanda-console:8080/auth/callbacks/oidchttp://redpanda-console:8080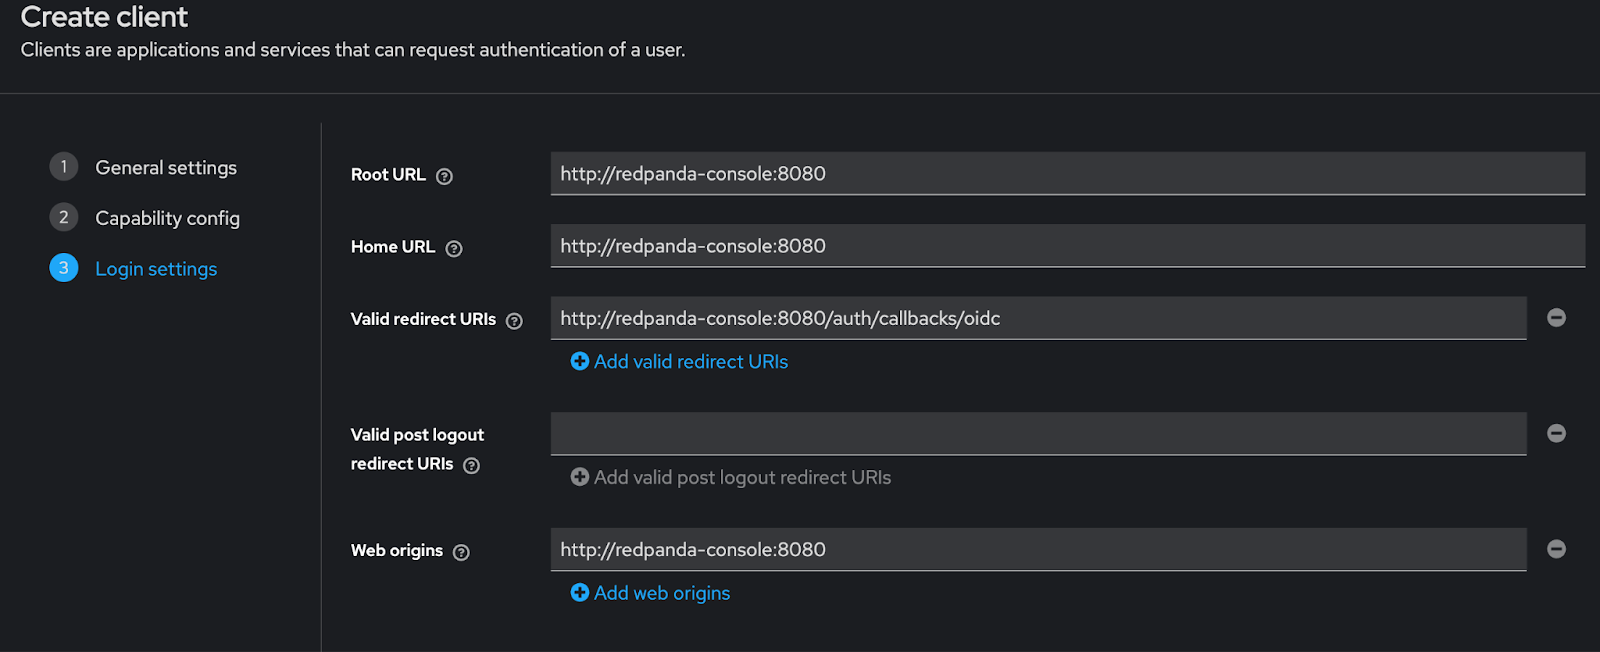
Click Save. Navigate to the Clients page and select the redpanda client. Click the Credentials tab. Copy the Client Secret and save it for later.
Navigate to the Users page -> Add user. Next, create a test Kryptonian user as follows:
Click Create and select the Credentials tab. Click Set password and input a password. Disable Temporary.
Now that we have the redpanda realm created, exec into Keycloak again and disable TLS on the redpanda realm.
docker exec -it keycloak sh
cd /opt/keycloak/bin
./kcadm.sh config credentials --server http://keycloak:8088 --realm master --user admin
./kcadm.sh update realms/redpanda -s sslRequired=NONEOIDC Authentication in Redpanda Console lets users log in and optionally forward their credentials to the connected cluster.
First, go to the ./config/console-config.yaml file and paste the redpanda realm client secret you saved from Keycloak to the authentication.oidc.clientSecret property.
A few notes:
impersonateUser: true is set for the Kafka API, Schema Registry API, and Admin API so that access control is fine-grained and centralized within Redpanda. This way, audit logs are also more accurate, as they reflect the actual user identity.authentication.jwtSigningKey is used, you can generate your own signing key if desired, it must be at least 32 characters. Use the environment variable AUTHENTICATION_JWTSIGNINGKEY in production.authentication.useSecureCookies is false for demo purposes. We recommend that you set it to true in production to ensure that cookies are sent over HTTPS only.authentication.oidc.clientSecret is in plain text for demo purposes. Use the environment variable AUTHENTICATION_OIDC_CLIENTSECRET in production.authentication:
jwtSigningKey: VPIZk635JwGHC2Uu0kAnaGy7Vna1QryrProZKpkwG40=
useSecureCookies: false
basic:
enabled: true
oidc:
enabled: true
issuerUrl: 'http://keycloak:8088/realms/redpanda'
clientId: redpanda
clientSecret: <your client secret>
redirectUrl: 'http://redpanda-console:8080/auth/callbacks/oidc'
prompt: consent
accessType: offline
principalMapping: $.emailNext, restart Redpanda Console.
docker restart redpanda-consoleLog in with SASL-SCRAM authentication at http://redpanda-console:8080/ as the superuser with password secretpassword and verify the cluster is in a healthy state. We’ll log in again as an OIDC user later.
Before we jump into configuring each of the Redpanda APIs for OIDC authentication, check out the limitations as of the time of this writing.
Okay, now install rpk and create your profile.
brew install redpanda-data/tap/redpanda
rpk profile create <cluster-name> --from-profile rpk-profile.yaml
Use rpk to configure OIDC cluster settings.
A few good-to-know notes:
oidc_discovery_url tells Redpanda where to discover the endpoints and other configuration information of the OIDC provider. The URL can be found in the IdP console.oidc_token_audience - The aud claim in the token signifying the intended recipient. We’re using the default account audience in the Keycloak client for Redpanda. (See OIDC credential flow and access token validation documentation for details on token payload requirements for custom audiences.) oidc_principal_mapping maps the email claim in the token to the user principal identity. This principal can then be assigned to Redpanda roles and ACLs. You can also map other claims to the principal. See Transform identities with principal mappings documentation for details.enable_sasl: true has already been set in bootstrap.yml. This is required to allow SASL authentication method on the Kafka APIschema_registry_enable_authorization: true has already been set in bootstrap.yml. This is required to enable fine-grained access control on Schema Registry API (v25.2+)#rpk cluster config set enable_sasl true
#rpk cluster config set schema_registry_enable_authorization true
rpk cluster config set sasl_mechanisms '["SCRAM","OAUTHBEARER"]'
rpk cluster config set oidc_discovery_url 'http://keycloak:8088/realms/redpanda/.well-known/openid-configuration'
rpk cluster config set oidc_token_audience 'account'
rpk cluster config set oidc_principal_mapping '$.email'
rpk cluster config set oidc_clock_skew_tolerance 30
rpk cluster config set oidc_keys_refresh_interval 3600
rpk cluster config set http_authentication '["BASIC","OIDC"]'Configure the API listeners of each Redpanda node for the correct authentication methods. The example node config files in the /config folder have pre-configured exposed listeners with the name external and authentication methods as follows:
kafka_api and advertised_kafka_api - authentication_method: saslpandaproxy_api and advertised_pandaproxy_api - authentication_method: http_basicschema_registry_api - authentication_method: http_basicRestart the Redpanda nodes.
docker restart redpanda-0
docker restart redpanda-1
docker restart redpanda-2Now that we have authentication configured, we must configure authorization for our users.
Access Control Lists (ACLs) can be configured either in Redpanda Console or with rpk. To configure a one-off ACL in Console, go to http://redpanda-console:8080 and log in as superuser with password secretpassword.
Click Security -> ACLs -> Create ACLs. Click Allow all operations and enter clark.kent@redpanda.com. The principal should match the field you configured in the Redpanda Console configuration. In our case, it was $.email for the email address.

Go to http://redpanda-console:8080 and click Log in with OIDC. You’ll be redirected to Keycloak. Sign in as clark.kent.
You can use role-based access control (RBAC) and assign a role and ACL to an OIDC principal with rpk.
Role creation is possible in rpk or Redpanda Console, however OIDC principal assignment is currently only possible with rpk.
rpk security role create Admin
rpk security acl create --allow-role "RedpandaRole:Admin" --operation "all" --topic "*" --cluster --transactional-id "*" --group "*" --registry-subject "*" --registry-global -X registry.hosts=localhost:18081
rpk security role assign Admin --principal User:clark.kent@redpanda.com
Go to http://redpanda-console:8080 and click Log in with OIDC. You’ll be redirected to Keycloak. Sign in as clark.kent.
Congratulations! You’ve successfully integrated the IdP with Redpanda. Click into the different sections of Redpanda Console to confirm everything is working as expected. Next, we’ll try out direct access to Redpanda APIs using an OIDC token.
Configure an OIDC principal as superuser if the user requires Admin API access.
rpk cluster config set superusers '["superuser","clark.kent@redpanda.com"]'Obtain JWT token from Keycloak.
export KC_TOKEN=$(curl -sS -X POST 'http://keycloak:8088/realms/redpanda/protocol/openid-connect/token' -H 'Content-Type: application/x-www-form-urlencoded' -d 'client_id=redpanda' -d 'username=clark.kent' -d 'password=password' -d 'grant_type=password' -d 'client_secret=<your client secret>' | jq -r '.access_token')Get topics from HTTP proxy.
curl -sS http://localhost:18082/topics -H "Authorization: Bearer $KC_TOKEN" | jqGet node config from Admin API.
curl -sS http://localhost:19644/v1/node_config -H "Authorization: Bearer $KC_TOKEN" | jqGet subjects from Schema Registry API.
curl -sS http://localhost:18081/subjects -H "Authorization: Bearer $KC_TOKEN" | jqRun through these tests again with a different user who doesn’t have the appropriate ACLs to confirm that authorization is working as expected.
Redpanda’s auditing capabilities support recording both administrative and operational interactions with topics and users. Redpanda complies with the Open Cybersecurity Schema Framework (OCSF), providing a predictable and extensible solution that works seamlessly with industry-standard tools.
With audit logging enabled, there should be no noticeable changes in performance other than slightly elevated CPU usage.
_redpanda.audit_log.
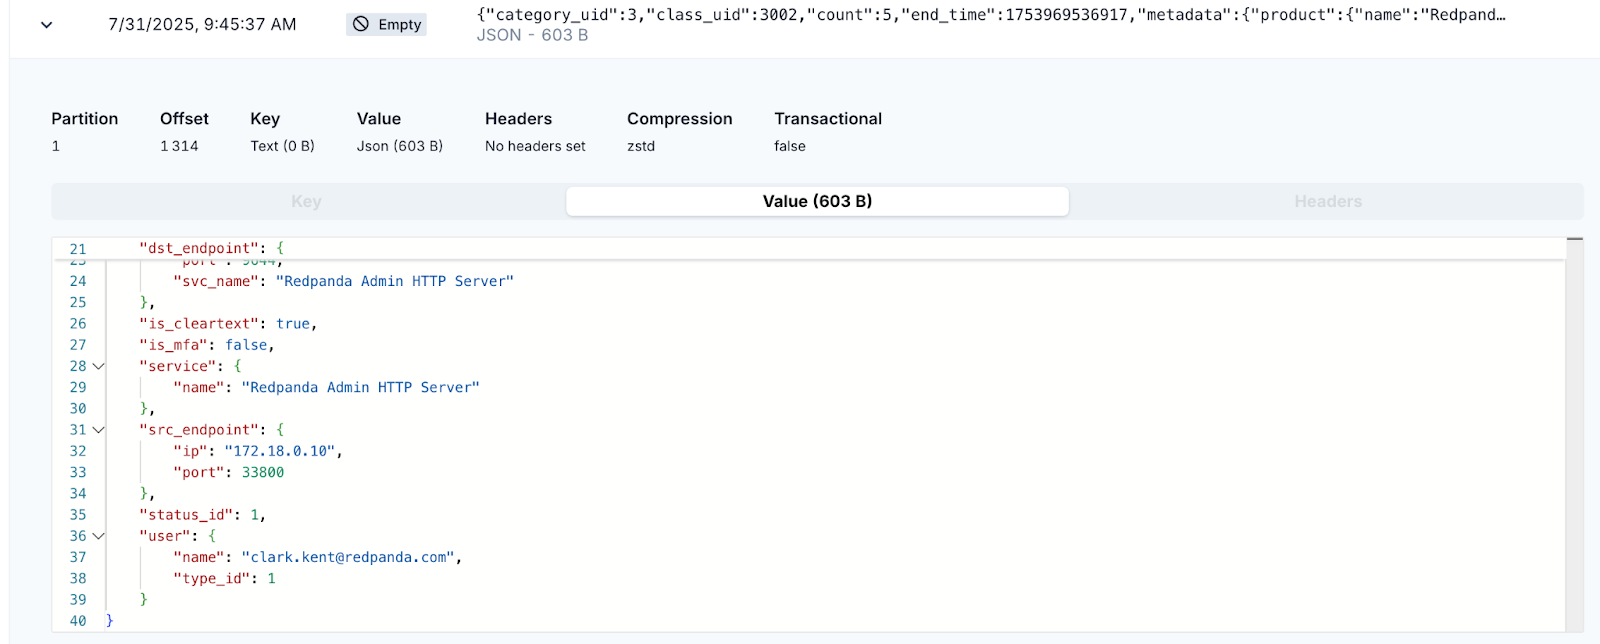
Filter the message log to show only Authentication events. Redpanda produces the standard OCSF class messages. Class UID 3002 is used for all authentication events.
Click Add filter, enter a helpful name, and save the following JavaScript:
if (value.class_uid == '3002')
return true
You should now see only audit events associated with authentication.
Expand the most recent message and review it. You’ll see that clark.kent@redpanda.com’s authentication event has been logged, including relevant metadata such as time, source IP, service name, and more.
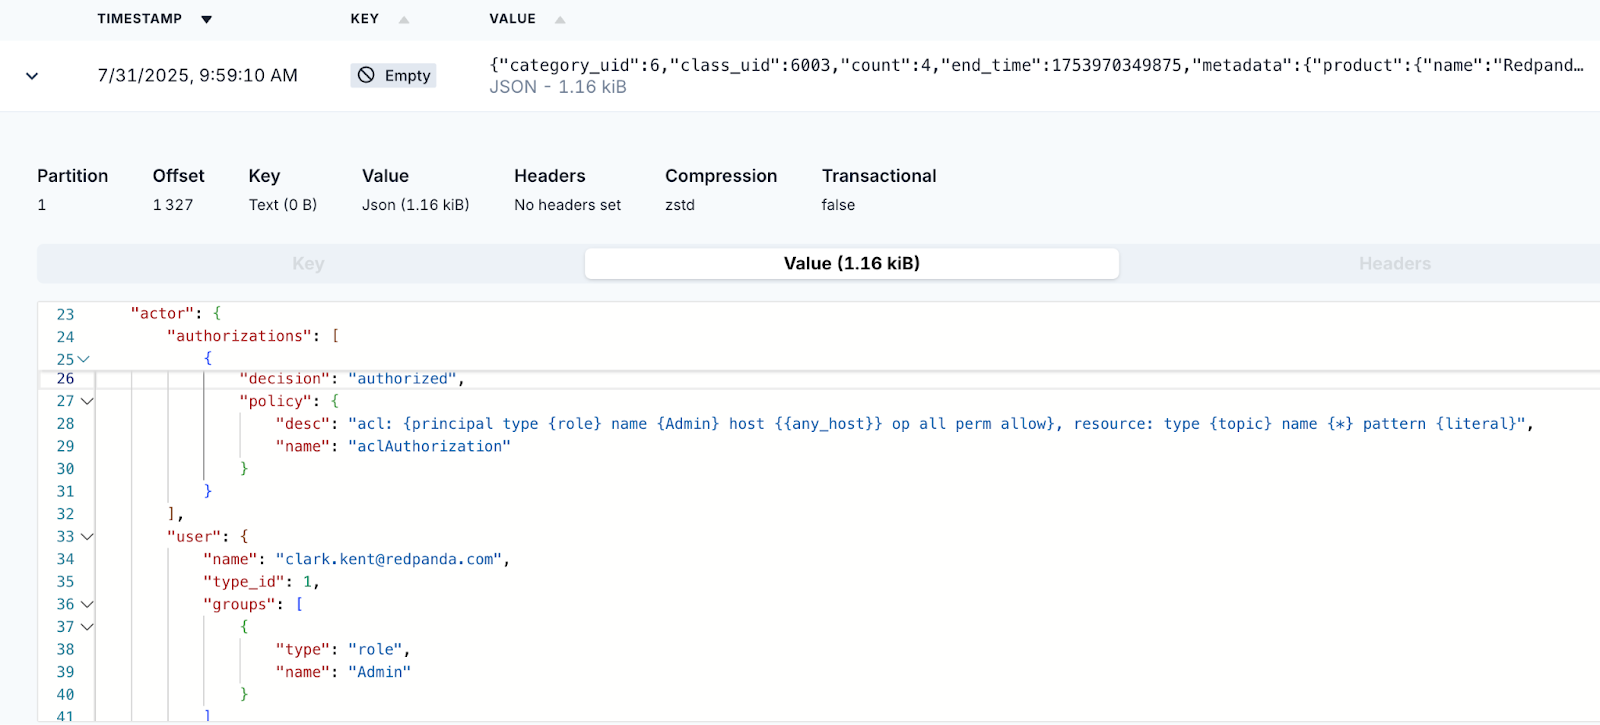
Create another filter to show API Activity. These messages will contain information about authorizations. Here’s the JavaScript filter code:
if (value.class_uid == '6003')
return true
Click the Authentication Events filter to disable it. It will be noted as disabled with a strikethrough. Click on a message with class_uid:6003 to view various API activity events. Note that the actor object contains authorization information about the user.
OIDC brings many benefits to Redpanda, most importantly, protecting your critical data from unauthorized access and streamlining the user and operational experience. As a reminder, you can find all the files for this demo in the GitHub repository.
If you’re ready to take the next step, contact us to learn more about securing your Redpanda deployment. For anything else or to chat with our engineers, hop into the Community Slack.
Now deployable on Amazon Web Services (AWS)

Your analytics stack can only see data that made it through the pipeline. That's only half the picture.

Solving the performance bottleneck for high-latency storage
Subscribe to our VIP (very important panda) mailing list to pounce on the latest blogs, surprise announcements, and community events!
Opt out anytime.