How to build a governed Agentic AI pipeline with Redpanda
Everything you need to move agentic AI initiatives to production — safely
Learn how to deploy a resilient Redpanda cluster on EC2 instances by leveraging AWS Placement Groups with Redpanda’s rack awareness feature.
There are many options to choose from when building resilient Redpanda clusters. In another series, we covered high availability deployment patterns and setting up a high availability environment in Redpanda.
In this series, we’ll discuss Placement Groups in depth–a deployment strategy allowing you to spread out virtual machine instances across underlying hardware to minimize correlated failures. When you combine Placement Groups with Redpanda’s rack awareness, you can achieve resiliency within the scope of a single DC/AZ.
This post walks you through the relevant configuration details–we’ll deploy a Redpanda cluster on AWS EC2 with Terraform and Ansible scripts, which leverage the partitioned Placement Groups to configure rack awareness.
While multi-AZ and multi-region deployments offer resiliency at higher degrees, they also introduce added latency, deployment complexity, and cross-AZ/DC data transfer costs. Also, use cases like the following prove to yield better results in a single DC/AZ deployment in terms of performance and cost.

When you have a use case for a single DC/AZ Redpanda deployment, you can still achieve resiliency with Placement Groups, which allows you to trade in some degree of reliability for reduced admin overhead and zero data transfer costs.
As applications evolve, high availability (HA) becomes critical at some point—specifically, ensuring that within an AZ/DC, there are no single points of failure in application components or single fault domain. From an architectural perspective, how do you ensure that a Redpanda cluster survives an entire DC/AZ failure?
Redpanda leverages the Raft consensus algorithm for failure detection and recovery. For Raft to tolerate F failures, it needs at least N = 2F + 1 entities, requiring at least three participants to maintain the consensus. Therefore, when deploying a Redpanda cluster, you can achieve HA within a DC/AZ by spreading its nodes across at least three failure domains (or fault domains). A failure domain is a self-contained hardware infrastructure with dedicated power and networking that is isolated from correlated failures. A failure domain could be a rack, a row, a building, or even an entire data center within a data center.
As far as the cloud is concerned, a Placement Group is a concept introduced by AWS to provide multiple failure domains within a single AZ.
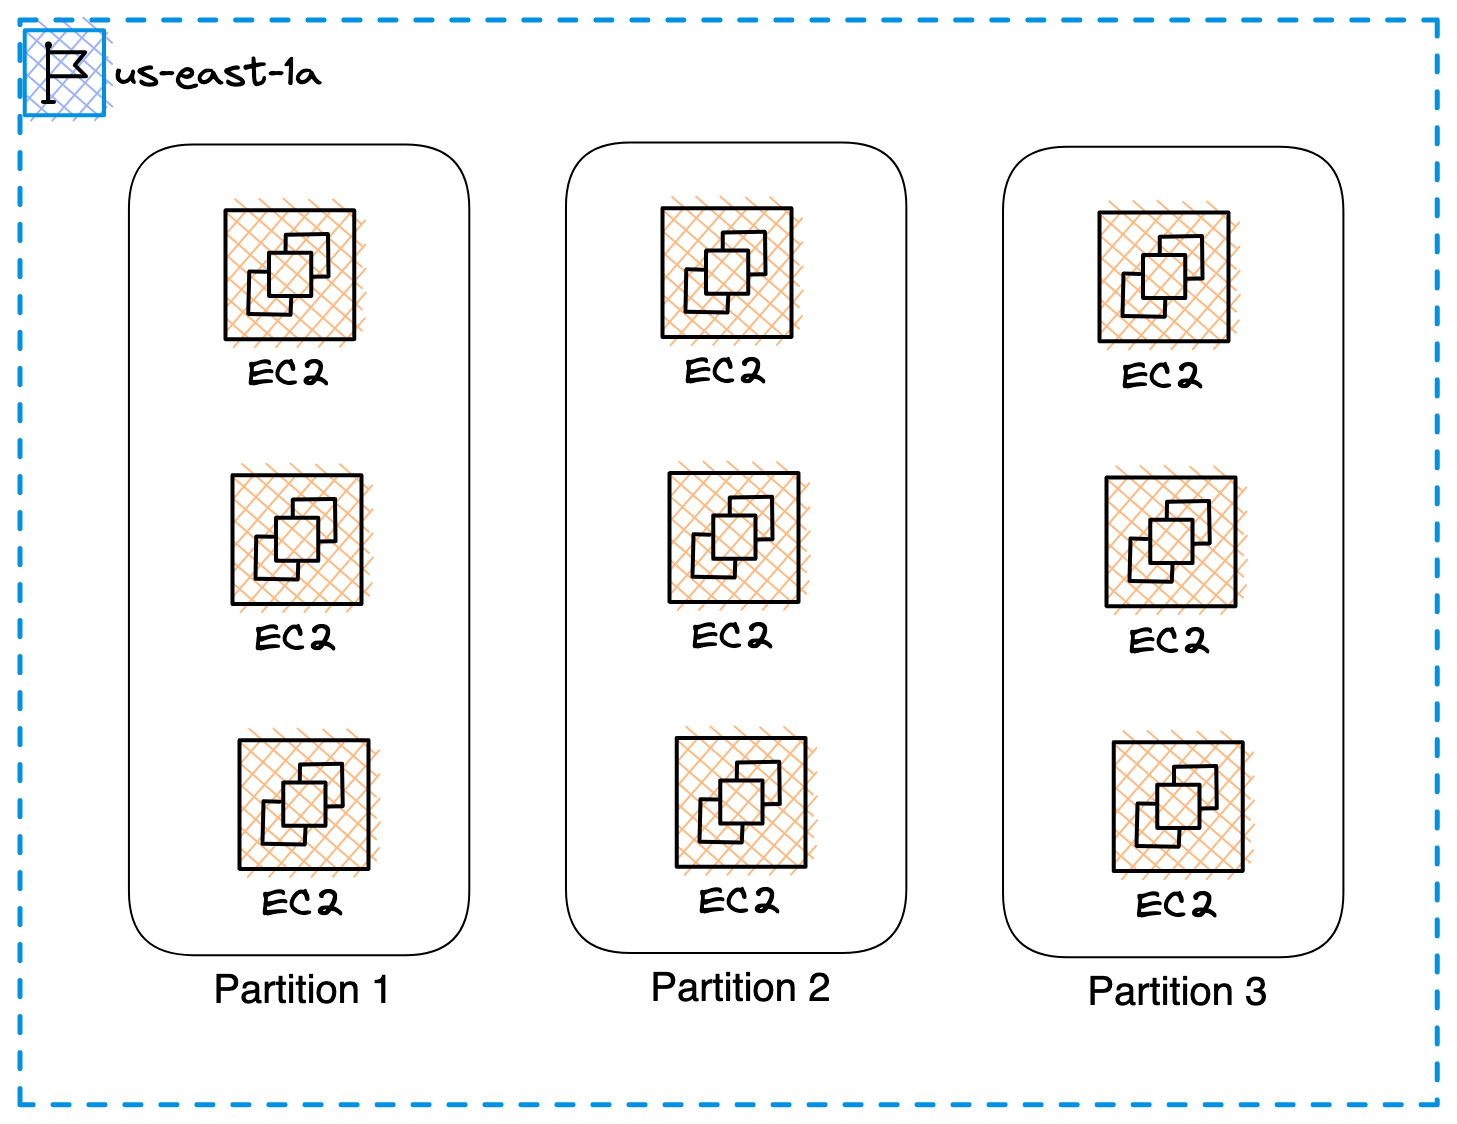
Placement groups enable you to influence how your AWS EC2 instances are placed within underlying hardware. While EC2 offers different types of placement groups to address different types of workloads, including cluster and spread placement groups, Partition placement groups enable spreading hosts across multiple partitions (or racks/failure domains) within an AZ.
EC2 allows you to deploy up to 100 instances within a partition, making it an ideal choice for deploying large-scale distributed systems, such as HDFS, Hadoop, and Kafka. Each AZ in AWS has access to at least seven distinct partition placement groups.
EC2 subdivides each partition placement group into logical segments called partitions to isolate the impact of hardware faults. EC2 ensures that no two partitions within a placement group share the same racks.

Within a partition, all EC2 instances could fail together. But, across partitions, there are no shared failures.
Now we understand the different failure domains in a single data center, as well as a cloud AZ. Next, we will explore the process of deploying a single-zone Redpanda cluster on AWS EC2 nodes.
Imagine there’s a Redpanda cluster of N brokers. How do we ensure all nodes are evenly distributed across all failure domains? Can we bake that intelligence into the product level?
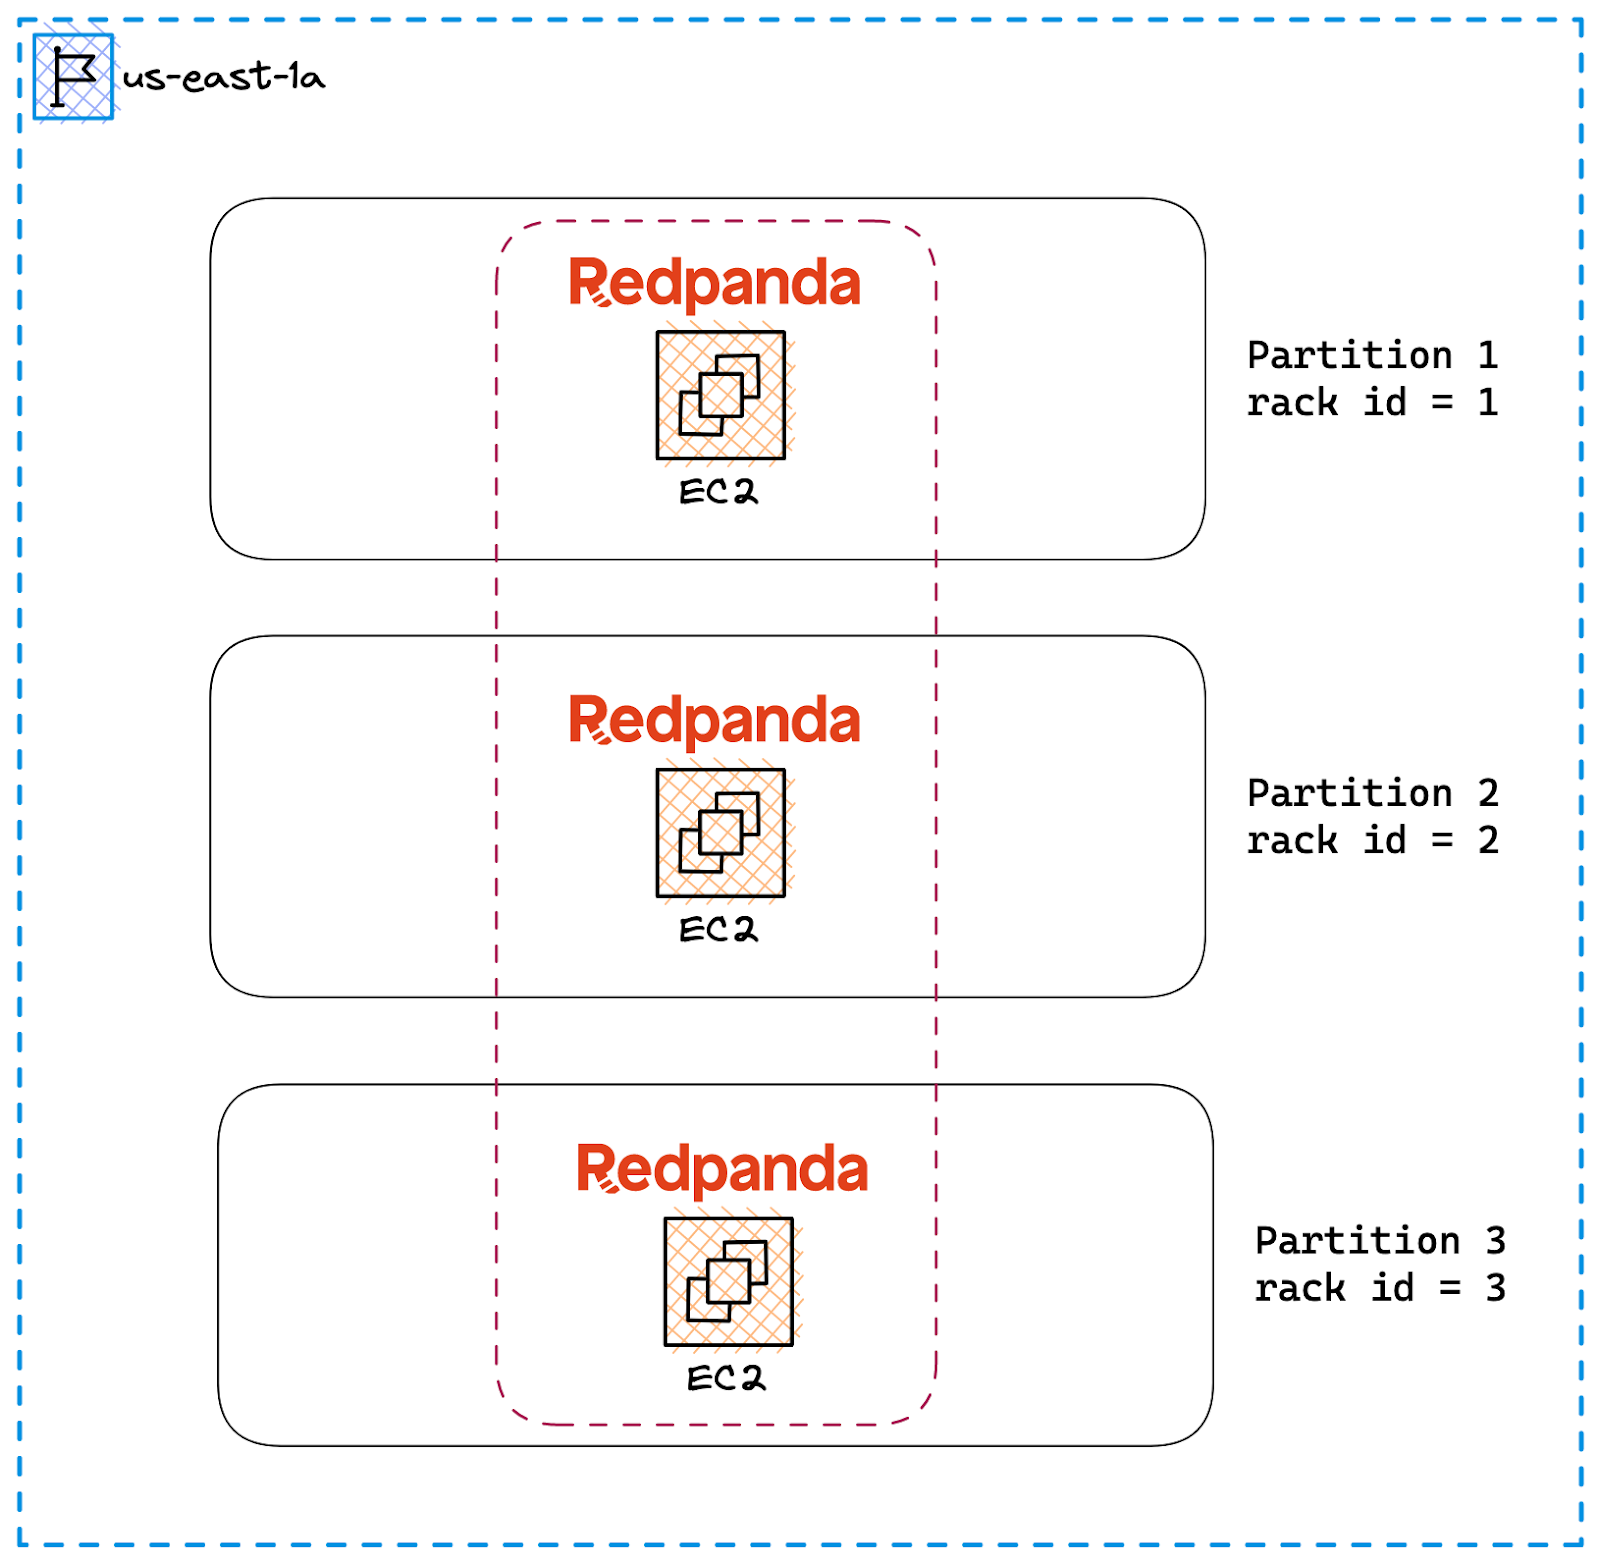
Yes, it is possible with Redpanda’s rack awareness feature, which deploys N Redpanda brokers across three or more failure domains. In an on-premises network, this means distributing replicas of the same partition across different racks to minimize data loss in the event of a rack failure.
When it comes to the cloud, a rack translates as a partition in a Placement Group.
Assume we’re deploying a cluster of three Redpanda brokers on EC2 instances within a single AZ. By default, Placement Groups allows you to create partitions (with a maximum of seven). So, we can achieve HA within the zone by deploying three brokers across three partitions. This can be combined with Redpanda’s replication factor setting so that each topic partition replica is guaranteed to be isolated from the impact of hardware failure.

You can automate the cluster creation with the Terraform and Ansible scripts provided in the following GitHub repository. First, clone it to your local machine by running:
gitclonehttps://github.com/redpanda-data/deployment-automation
This repository contains the necessary deployment automation scripts to provision, configure, and run a Redpanda cluster (of three nodes by default) inside a cloud platform of your choice. Not only that saves your time, but also makes the cluster creation repetitive and deterministic.
For this example, let’s use AWS specific deployment automation scripts, which you can find inside the /aws folder.
When provisioning the infrastructure, we should instruct AWS to:
This has already been scripted the Terraform script cluster.tf located inside the deployment-automation/aws folder.
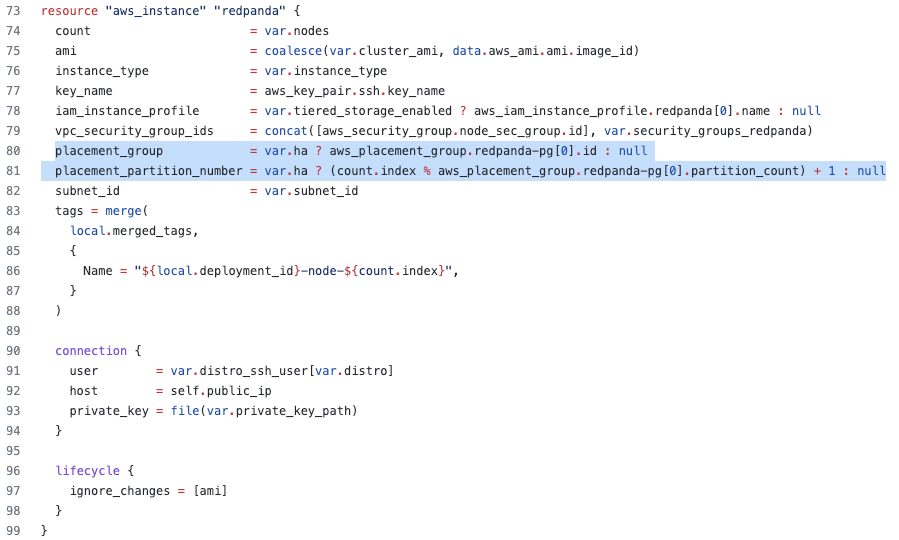
For example, the following code inside the cluster.tf declares an AWS resource for a Placement Group of three partitions.
Whenever Terraform creates an EC2 instance, it assigns the relevant partition from the Placement Group created above.

Once these configurations are in place, you can run the Terraform scripts and related Ansible playbooks to provision the cluster in EC2. You can read our blog post with a detailed walkthrough of infrastructure provisioning. We’ll skip that information here.
Once you have the Redpanda cluster provisioned in EC2, rack awareness must be enabled at the cluster level to ensure that no more than a minority of replicas appear on a single rack (partition of the Placement Group).
Enabling rack awareness requires two steps:
enable_rack_awareness, which can either be set in the /etc/redpanda/.bootstrap.yaml or can be set using the following command:For each node, you can set the rack id in the /etc/redpanda/redpanda.yaml file, or by running:
rpk redpanda config set redpanda.rack <rackid>
However, you don’t have to apply these configurations manually. They can be automated as we did for the Placement Groups.
As with the Terraform scripts, we have modified our Ansible playbooks to take a per-instance rack variable from the Terraform output and use that to set the relevant cluster and node configuration. Redpanda’s deployment automation can now provision public cloud infrastructure with discrete failure domains (-var=ha=true) and use the resulting inventory to provision rack-aware clusters using Ansible.
Once the provisioning is complete, you can verify all three brokers have been assigned to the correct racks (partitions) by running this command.
Although AWS brought up the Placement Group concept first, other cloud providers, including Microsoft Azure and Google Cloud quickly adopted it and started offering similar services.
For example, Microsoft Azure provides Flexible scale sets, which allow you to assign VMs to specific fault domains. Each scale set can have up to five fault domains (depending on your region). Google Cloud also has Instance Placement Policies, allowing you to specify how many availability domains you can have (up to a maximum of eight).

In this post, we deployed a resilient Redpanda cluster on EC2 instances by leveraging AWS Placement Groups with Redpanda’s rack awareness feature.
The placement group strategy will need to be applied to the Kubernetes (K8s) cluster. (For example, AWS EKS supports creating Placement Groups under managed node groups). This will determine how the underlying nodes are deployed. Since the cloud provider does not reveal rack details to K8s, the best way is to manually annotate the K8s nodes:
When provisioning Redpanda broker, simply enable the rack awareness and add customized node annotation:
Alternatively, if you already have the cluster provisioned, you can update the set setting with configuration file (values.yaml):
And run:
In this blog post, you learned about the Placement Group concept, which allows you to have multiple failure domains within the scope of a single AZ.
When deploying a Redpanda cluster in a single AZ, you can leverage partition Placement Groups to spread the hosts across multiple network partitions such that we can mitigate against all but total-AZ failure scenarios. We also discussed deploying a Redpanda cluster with partition Placement Groups in an AWS AZ.
In the upcoming part of this series, we’ll explore creating highly available clusters across availability zones and regions and discuss the advantages of this approach compared to intra-AZ deployments.
In the meantime, join the Redpanda Community on Slack to ask your HA deployment questions or to request coverage of other HA-related features.
Subscribe to our VIP (very important panda) mailing list to pounce on the latest blogs, surprise announcements, and community events!
Opt out anytime.