Build a real-time lakehouse architecture with Redpanda and Databricks
One architecture for real-time and analytics workloads. Easy to access, governed, and immediately queryable
Learn how to integrate ClickHouse with Redpanda and build scalable, performant, real-time databases.
You can integrate ClickHouse with Redpanda by running both in Docker containers, creating a topic within Redpanda, creating a database and a table in ClickHouse configured for the Redpanda cluster for stream ingestion, and producing data from a CSV file to the Redpanda topic. This setup allows your system to process data in real time.
You can run Redpanda and ClickHouse in Docker containers by setting up a Docker network for your Redpanda cluster to be accessible from other containers, creating a shared volume for the Redpanda container, and starting up the Redpanda and ClickHouse containers. For Redpanda, you will use port 9092 for access, and for ClickHouse, you will use port 18123 for its UI access.
ClickHouse is a scalable, reliable, secure, and performant OLAP database that works one hundred to one thousand times faster than traditional approaches. It is an excellent choice for processing hundreds of millions (or even over a billion) rows of data and tens of gigabytes of data per server, per second for analysis. It handles real-time data efficiently and provides integrations with many NoSQL or relational databases and streaming platforms.
The prerequisites for integrating Redpanda and ClickHouse include a macOS environment and Homebrew package manager, and a recent version of Docker installed on your machine. This setup allows you to run Redpanda and ClickHouse in Docker containers for real-time data streaming and analysis.
Many businesses that capture and analyze huge amounts of data on a daily basis create even more data as they report on their findings.
As these companies and their data continue to grow, real-time data analysis becomes more and more important. More raw data means more data to be analyzed, and this means more data output. All of this leads to greater resources and staffing needed to gather and analyze the data, especially if the company’s data processes are manual, whether in whole or in part.
Relational databases are increasingly inefficient for analytical data-processing needs. On the other hand, OLAP databases that can scale and provide performant queries are becoming more popular every day.
ClickHouse, is a scalable, reliable, secure, and performant OLAP database that works one hundred to one thousand times faster than traditional approaches. This makes ClickHouse an excellent choice when it comes to processing hundreds of millions (or even over a billion) rows of data and tens of gigabytes of data per server, per second for analysis.
You can use ClickHouse to keep your platform logs or use it as your event store for your high-traffic business. It handles real-time data in a very efficient way and provides integrations with many NoSQL or relational databases and streaming platforms like RabbitMQ and Apache KafkaⓇ.
Kafka allows you to publish or subscribe to data flows, organize fault-tolerant storage, and process streams as they become available. You can stream any data from Kafka to a ClickHouse table with a few easy configurations, enabling your system to process data in real time.
Streaming and processing data in real time requires high performance and low latency. Kafka is often suitable, but it might not be enough for some use cases that need high-performance and low-resource usage in particular. Redpanda, however, provides a fast and safe-by-default system that’s API compatible with Kafka. Redpanda also consumes less resources than Kafka, and it has a single binary to deploy, without ZooKeeperⓇ.
You can integrate ClickHouse with Redpanda for many use cases requiring fast, reliable streaming and a highly performant query base. The two are great companions to one another for businesses with quickly growing needs for data gathering and real-time analytics.
In this article, you’ll go through a step-by-step tutorial that will teach you how to do the following:
rpk CLIrpk CLI and feed data into the ClickHouse tableIf you’d like to follow along, you can access all the code for this tutorial in this repository.
In order to proceed, you’ll need the following prerequisites:
Homebrew package manager installedLet’s set the scene. In this example scenario, PandaHouse is a contractor-based real estate agency. The real estate agents get area information from PandaHouse on a weekly basis and search for real estate properties that are for sale. On a daily basis, the agents complete their research and send their findings via email in any textual format.
PandaHouse wants to change this process because of these reasons:
Thus, PandaHouse has been searching for a specialist to solve this problem by implementing a real-time streaming system that can handle the data from agent reports and save them in a scalable and performant database. They want to run some complex queries that should fetch the real-time data very quickly.
You decide to use Redpanda for the streaming platform and ClickHouse as the database, which provides a scalable OLAP data system where PandaHouse can create fast queries for analysis.
You can run Redpanda in many ways, one of which is to use a container runtime such as Docker. Even though you don’t need to install Redpanda on your system for this tutorial, you must set up a few things before running Redpanda on Docker as part of the tutorial.
For more information on how to run Redpanda by using Docker, please refer to this documentation.
First, set up a Docker network to ensure your Redpanda cluster is accessible from other containers. Create a Docker network called panda-house with the following command:
docker network create panda-house
Create a folder called panda_house in your home directory. You will use this directory as a shared volume for the Redpanda container in the steps below.
mkdir ~/panda_house
Run the following command to start up a Redpanda container that mounts the folder ~/panda_house, which will be used as a shared volume:
docker run -d --pull=always --name=redpanda-1 --rm \
    --network panda-house \
    -v $HOME/panda_house:/tmp/panda_house \
    -p 9092:9092 \
    -p 9644:9644 \
    docker.vectorized.io/vectorized/redpanda:latest \
    redpanda start \
    --advertise-kafka-addr redpanda-1 \
    --overprovisioned \
    --smp 1  \
    --memory 2G \
    --reserve-memory 200M \
    --node-id 0 \
    --check=false
Your output will be as follows:
Trying to pull docker.vectorized.io/vectorized/redpanda:latest...
Getting image source signatures
Copying blob sha256:245fe2b3f0d6b107b818db25affc44bb96daf57d56d7d90568a1f2f10839ec46
...output omitted...
Copying blob sha256:245fe2b3f0d6b107b818db25affc44bb96daf57d56d7d90568a1f2f10839ec46
Copying config sha256:fdaf68707351dda9ede29650f4df501b78b77a501ef4cfb5e2e9a03208f29068
Writing manifest to image destination
Storing signatures
105c7802c5a46fa691687d9f20c8b42cd461ce38d625f285cec7d6678af90a59
The command above pulls the latest Redpanda image from docker.vectorized.io repository and runs the container with the exposed ports 9092 and 9644. In this tutorial, you will use port 9092 for accessing Redpanda.
Notice that you have the --advertise-kafka-addr flag value as redpanda-1. This configuration sets the advertised listeners of Redpanda for external accessibility in the network. In this case, it is the Docker network panda-house.
Validate your Redpanda container by running the following command.
docker ps
The output must be as follows:
CONTAINER ID  IMAGE                                            COMMAND               CREATED        STATUS            PORTS                                           NAMES
105c7802c5a4  docker.vectorized.io/vectorized/redpanda:latest  redpanda start --...  3 seconds ago  Up 3 seconds ago  0.0.0.0:9092->9092/tcp, 0.0.0.0:9644->9644/tcp  redpanda-1
To validate the cluster, use the following command:
docker exec -it redpanda-1 \
    rpk cluster info
It must return the following output:
BROKERS
=======
ID    HOST        PORT
0*    redpanda-1  9092
Your Redpanda cluster is then ready to use.
You also run ClickHouse as a Docker container in this tutorial. Run the following command to run ClickHouse with the port 18123 for its UI access.
docker run -d --pull=always --name=clickhousedb-1 --rm \
--network panda-house \
-p 18123:8123 \
--ulimit nofile=262144:262144 \
docker.io/clickhouse/clickhouse-server
In your browser, navigate to http://localhost:18123/play to see ClickHouse’s Play UI, where you can run SQL queries on the ClickHouse database:

To test the query page, run the following command:
show databases;The output should look like this:
INFORMATION_SCHEMA
default
information_schema
systemNext, you’ll use rpk to create a topic in Redpanda for ClickHouse to consume messages from.
Run the following command to create a topic called agent-reports in the Docker container:
docker exec -it redpanda-1 \
rpk topic create agent-reports
Verify that you have the topics created:
docker exec -it redpanda-1 \
rpk cluster info
You should get the following output:
BROKERS
=======
ID    HOST         PORT
0*    redpanda-1   9092

TOPICS
======
NAME                   PARTITIONS  REPLICAS
agent-reports             1           1
Then, in ClickHouse, create a database called panda_house using the following command:
CREATE DATABASE panda_house;Copy this command and paste it in the Play UI. Then click the Run button. The result should be as follows:

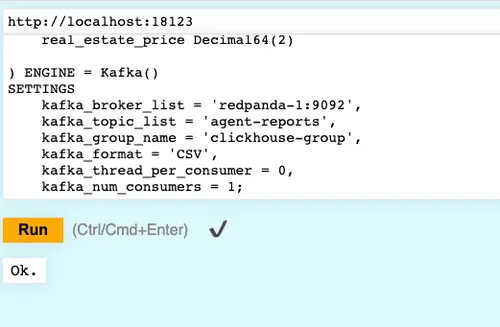
Next, create the ClickHouse table in the panda_house database you just created, with the appropriate settings for consuming messages from the agent-reports topic. Copy the following SQL command and paste it in the Play UI to create a table called agent_reports:
CREATE TABLE IF NOT EXISTS panda_house.agent_reports
(
    agent_id UInt64,
    real_estate_map_url String,
    real_estate_type String,
    real_estate_price Float32

) ENGINE = Kafka()
SETTINGS
    kafka_broker_list = 'redpanda-1:9092',
    kafka_topic_list = 'agent-reports',
    kafka_group_name = 'clickhouse-group',
    kafka_format = 'CSV'
Notice that the table-creation query snippet provides the fields that PandaHouse requires. In the SETTINGS part, examine that you have a set of Kafka configurations:
kafka_broker_list has the Redpanda broker URL value that is accessible in the Docker network.kafka_topic_list has the agent-reports topic name, which you created previously.kafka_group_name configuration sets the consumer group ID, which depends on your choice.kafka_format configuration is important because PandaPost requests you to consume data that is in the CSV format.Run the command by clicking the Run button to create the agent_reports table. The output should be as follows:

You now have a Redpanda cluster with a topic called agent-reports, and you’ve configured your ClickHouse table with the Redpanda topic configuration.
Next, you’ll download the CSV file that has the real estate agents’ report data into the panda_house folder created earlier. You can do this either from a browser or the terminal.
From a browser, access the data here and select Download. The file name should be agent-reports-data.csv.
Or, from the terminal:
cd ~/panda_house
curl -LO https://raw.githubusercontent.com/redpanda-data-blog/2022-clickhouse-real-time-OLAP-database/main/resources/data/agent-reports-data.csv?token=GHSAT0AAAAAABWFIO6BI5ZZKX6SFKCVLIFCYWF2SZQ
Run the following rpk command to produce the messages to Redpanda, simulating a client data stream:
docker exec -it redpanda-1 /bin/sh -c \
'rpk topic produce agent-reports < /tmp/panda_house/agent-reports-data.csv'
Assuming you get the following output, you’ve successfully sent 50000 records to Redpanda in just a few seconds:
...output omitted...
Produced to partition 0 at offset 49994 with timestamp 1651097984435.
Produced to partition 0 at offset 49995 with timestamp 1651097984435.
Produced to partition 0 at offset 49996 with timestamp 1651097984435.
Produced to partition 0 at offset 49997 with timestamp 1651097984436.
Produced to partition 0 at offset 49998 with timestamp 1651097984436.
Produced to partition 0 at offset 49999 with timestamp 1651097984436.
The same number of records must be sent to ClickHouse. To verify this, run the following query on the Play UI:
SELECT * FROM panda_house.agent_reports;You should get an error message like the following:
Code: 620. DB::Exception: Direct select is not allowed. To enable use setting `stream_like_engine_allow_direct_select`. (QUERY_NOT_ALLOWED) (version 22.4.2.1 (official build))
This means that you must use the stream_like_engine_allow_direct_select setting, which ClickHouse requires in order to run select queries for the tables that are configured for streaming. However, because this is a streaming table, once you run the command with this setting, your second query will be empty. To overcome this problem, you’ll need to create a materialized view that stores the data in memory.
Run the following query to create the materialized view for the agent_reports table:
CREATE MATERIALIZED VIEW panda_house.agent_reports_view
ENGINE = Memory
AS
SELECT * FROM panda_house.agent_reports
SETTINGS
stream_like_engine_allow_direct_select = 1;
Notice that stream_like_engine_allow_direct_select is enabled to be run once.
Alternatively, you can use an output table with a different engine like SummingMergeTree that does calculations as the data is streaming. For more details, visit this ClickHouse documentation page.
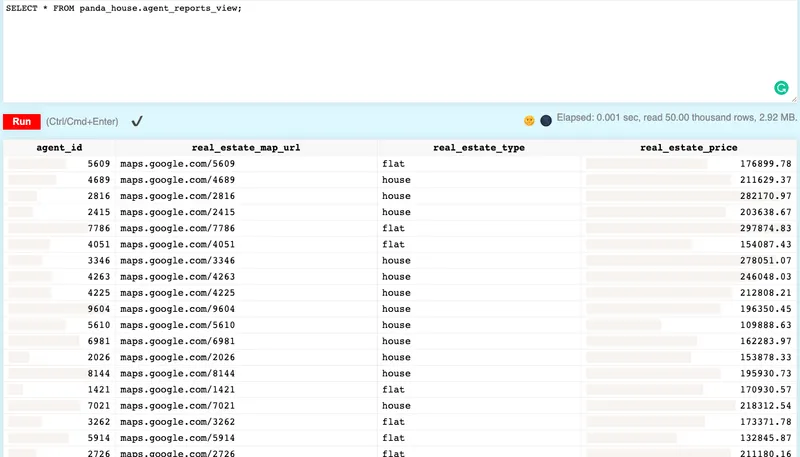
This time, run the query for the agent_reports_view materialized view:
SELECT * FROM panda_house.agent_reports_view;The query output should look like this:

Finally, let’s say that you want to find the average for real estate prices of the type flat that are not higher than 150,000.
SELECT AVG(real_estate_price)
FROM panda_house.agent_reports_view
WHERE real_estate_price<=150000;
The output should be 124784.96553493802.
You can stream other data to Redpanda to see if this average value changes. Run the following command to stream real estate with the type flat with a price of 150,000.
docker exec -i redpanda-1 \
rpk topic produce agent-reports <<< "7777,maps.google.com/7777,flat,150000"
Notice that the average changes to 124786.9952406826.
Now you have successfully completed all steps in the tutorial. You can stop the containers and remove the panda_house directory:
docker stop clickhousedb-1 && docker stop redpanda-1
rm -r ~/panda_houseCongratulations! You can now take what you’ve learned here and apply it to any number of use cases that require fast and reliable streaming and a highly performant query base.
You can follow a similar process to integrate any number of other tools with Redpanda, or to expand the capabilities of this demo scenario. You can find the resources for this tutorial in this repository.
Interact with Redpanda’s developers directly in the Redpanda Community on Slack, or contribute to Redpanda’s source-available GitHub repo here. To learn more about everything you can do with Redpanda, check out our documentation here.

One architecture for real-time and analytics workloads. Easy to access, governed, and immediately queryable

Everything you need to move agentic AI initiatives to production — safely
Subscribe to our VIP (very important panda) mailing list to pounce on the latest blogs, surprise announcements, and community events!
Opt out anytime.